Subsections
4.3 Basic Tools for Working with Channel and Layer Masks
This section discusses techniques for editing channel and layer masks.
Although, layer masks are used to edit a layer's alpha channel, and
channel masks are used to store and edit selections, these two mask
types behave similarly. Thus, the techniques for editing and
filtering them can be treated in a somewhat unified manner.
4.3.1 Painting Tools
One of the most direct ways to modify masks is with the GIMP's
painting tools. The Paintbrush, Pencil, Airbrush, Eraser, Ink Pen, Dodge and Burn, Smudge, and Bucket Fill tools can all be
used. The versatility of these tools allows masks to be created that
could not be duplicated using the selection tools alone. This is one
of the reasons why masks are complementary to the selection tools.
Figure
4.17
Figure 4.17:
Using Painting Tools on a Channel Mask
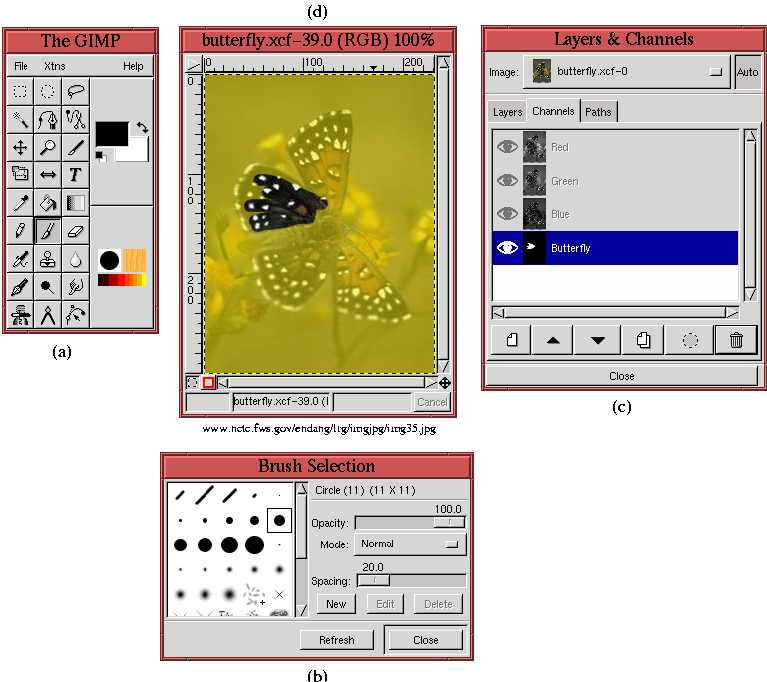 |
illustrates the use of the
Paintbrush tool to edit a channel
mask. As can be seen from Figure
4.17(a), the
Paintbrush tool has been selected from the Toolbox, and white is the
Active Foreground Color. Furthermore, as shown in
Figure
4.17(b), a medium hard brush has been selected
from the
Brush Selection dialog.
Figure
4.17(c) illustrates the Channels dialog, which
shows that an active channel mask labeled Butterfly has been created.
The mask's color is set to yellow, its opacity is 50%, and its Eye
icon is toggled on, which means the the channel mask can be seen in
the image window. The effect of the mask in the image window is shown
in Figure
4.17(d).
The partial transparency of the mask makes it easy to paint in the
image window while following the butterfly's outline. As already
noted, the mask acts like digital tracing paper. Some white strokes
can be seen in the channel mask thumbnail shown in
Figure
4.17(c). These were created by painting with
the Paintbrush tool in the image window. Because the channel
mask is active, the Paintbrush modifies the mask, not the image
layer. However, the effect in the image window is to reveal parts of
the image layer, as can be seen in Figure
4.17(d).
Regions that have been painted white can be repainted black, which
restores the mask. Note that although the mask appears yellow in the
image window, it actually remains a grayscale image. For this reason
white, black, and grays are the only colors that should be used when
painting in channel masks.


