|
 |
|
| |
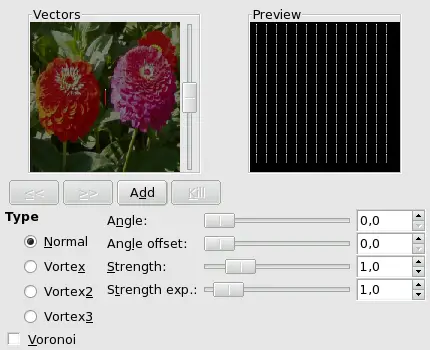
10.5. GIMPressionist - Orientation Map Editor
The Orientation-map editor is an annexe of the
GIMPressionist filter. You
can get to it by clicking on the Edit button
in the “Orientation” tab. With this editor, you can set
the direction that brush strokes given by filter will have.
10.5.2. Parameter Settings
You can place one or several vectors. You can set their direction and
their strength. They will act on the corresponding area of the image.
-
Vectors
-
In the left windows (Vectors) you can manage your vectors. By
default, a vector is at center. Vectors are red when they are
active, and grey when they are not with a white point at tip.
-
By clicking on the Add button, you add
a vector at center of the window, whereas clicking with the
mouse Middle Button puts it where you
click.
-
Clicking with the mouse Left Button
displaces the selected vector to the clicked point.
-
When clicking with the mouse Right
Button, the selected vector points to where you
have clicked.
-
Clicking on << and
>> buttons displaces focus from a
vector to another.
-
The Delete button allows you to delete
the selected vector.
![[Tip]](images/tip.png)
|
Tip |
|
With the scroll bar on the right of the Vectors panel, you can
set the image brightness. This can be very useful if the image
is very dark/bright and you can't see vectors well.
|
-
Preview
-
This Preview gives you an idea of the action of the various
vectors. The slider on the right border lets you change the
luminosity of this preview.
-
Type
-
You have there some types to arrange the brush strokes within the
selected vector domain. Describing them is difficult, but you can
see the result in the Preview.
-
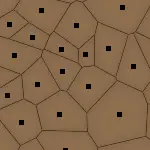
Voronoi
-
A Voronoi's diagram consists in
partitioning a plane with n master points into n polygons
where each polygon has only one of these n master points and
where any given other point of the polygon is closer to the
master point than to any other. So each polygon limit is
midway between two master point. Here is an example of a
Voronoi's diagram:
Here, when this option is checked, only the vector closest to
a given point of the image influences this point.
-
Angle
-
Angle: Direction of the selected vector.
This slider has the same action as right-clicking (see above).
-
Angle Offset
-
This slider allows you to change the angle of ALL vectors.
-
Strength
-
This slider acts on the influence domain of the selected vector.
This influence lowers with distance. Strength is showed with the
vector length.
-
Strength Exp.
-
This slider acts on the length of ALL vectors, and so changes
the strength of all brush strokes.
|
|
|