The most obvious is to open it using a menu, by choosing
→
from an image menu. This brings up a File Browser dialog, allowing you
to navigate to the file and click on its name. This method works well
if you know the name of the file you want to open, and where it is
located. It is not so convenient if you want to find the file on the
basis of a thumbnail.
![[Note]](images/note.png)
|
Note |
|
When you open a file, using the File menu or any other method,
GIMP
needs to determine what type of file it is. Unless there is no
alternative, GIMP
does not simply rely on the extension (such as ".jpg") to determine the
file type, because extensions are not reliable: they vary from system to
system; any file can be renamed to have any extension; and there are
many reasons why a file name might lack an extension. Instead,
GIMP
first tries to recognize a file by examining its contents: most of the
commonly used graphics file formats have "magic headers" that permit
them to be recognized. Only if the magic yields no result does
GIMP resort to using the extension.
|
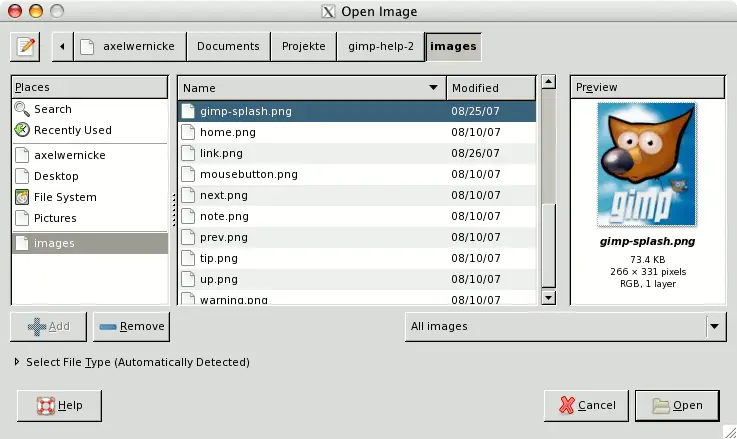
GIMP
2.2 introduced a new File Chooser that provides several features to help
you navigate quickly to the file you are looking for. Perhaps the most
important is the ability to create “bookmarks”
for folders that you use often. Your list of bookmarks appears on the
left side of the dialog. The ones at the top ( “Home”,
“Desktop”, etc) come automatically; the
others you create using the “Add”
button at the bottom of the list. Double-clicking on a bookmark takes
you straight to that directory.
At the center of the dialog appears a listing of the contents of the
selected directory. Subdirectories are shown at the top of the list,
files below them. By default all files in the directory are listed, but
you can restrict the listing to image files of a specific type using the
File Type selection menu that appears beneath the directory listing.
When you click on a file entry in the listing, if it is an image file, a
preview will appear on the right side of the dialog, along with some
basic information about the properties of the image. Note that previews
are cached when they are generated, and there are some things you can do
that may cause a preview to be incorrect. If you suspect that this may
be happening, you can force a new preview to be generated by holding
down the Ctrl key and clicking in the Preview area.
By default, a Location text box is present in the
File Open dialog. It may be absent: the
Ctrl+L key
combination toggles this text box.
|
|
Note |
|
In the great majority of cases, if you select a file name from the
list, and click the “Open” button in the lower right
corner or the dialog, GIMP will automatically
determine the file type for you. On rare occasions, mainly if the
file type is unusual and the name lacks a meaningful extension,
this may fail. If this happens, you can tell
GIMP specifically what type of file it is by
expanding the “Select File Typ” option at the bottom
of the dialog, and choosing an entry from the list that appears.
More commonly, though, if GIMP fails to open an
image file, it is either corrupt or not in a supported format.
|