This chapter introduces the GNOME desktop in Fedora. The desktop becomes easier to use after you know some of the common terminology used, beginning with the GNOME desktop.
If you installed Fedora 11 from the Fedora 11 Live image, whether for Intel or compatible (i686), PowerPC (ppc), or 64-bit (x86_64), GNOME is the installed desktop. You can find details of two alternative desktops in Chapter 4, Tour of the KDE desktop and Chapter 5, Tour of the Xfce desktop.
3.1. The GNOME desktop
The GNOME desktop
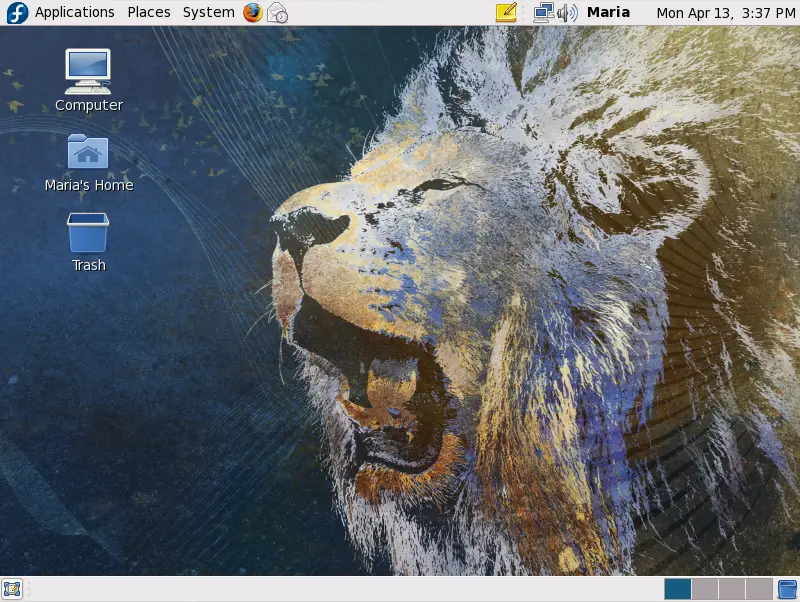
Figure 3.1. The GNOME desktop
The GNOME desktop has three distinct areas. From top to bottom, they are:
the top menu panel (the gray bar at the top).
the desktop area (the workspace area in the center that fills most of the screen).
the window list panel (the gray bar at the bottom).
3.1.1. The top menu panel
This panel stretches across the top of the screen. The left side contains:
the applications menu.
the places menu.
the system menu.
program icons for the default email program, web browser, and reminder notes.
The right side of the panel is home to:
the notification area.
a volume control.
the user switch area.
a clock and calendar.
Function description
If you hold the mouse pointer over the menu text or an icon, a brief description of its function appears. If you click one of these icons, that application starts.
3.1.1.1. The Applications menu
This menu contains a categorized list of installed applications, which are updated as necessary when software is installed or removed. When you click on Applications a drop-down list appears. The default list installed is:
Accessories
Games
Graphics
Internet
Office
Programming
Sound & Video
System Tools
3.1.1.2. The Places menu
This menu is divided into four subsections.
The first subsection allows quick access to commonly accessed folders, and makes it easy to keep your file system organized. These links are:
Home Folder where your personal files are kept by default.
Desktop, a folder within your Home Folder where the files and folders that appear on your desktop are stored.
Documents, a folder within your Home Folder intended as a place for you to store documents, such as those that you might have created with a word processor or spreadsheet program.
Music, a folder within your Home Folder intended as a place for you to store music files.
Pictures, a folder within your Home Folder intended as a place for you to store photographs and other pictures.
Videos, a folder within your Home Folder intended as a place for you to store videos.
Download, a folder within your Home Folder intended as a place for you to store miscellaneous files that you have downloaded from the Internet.
The second subsection allows quick access to:
the Computer window, which allows you to browse the computer's files and all data storage attached to the computer.
The third section provides links to tools that help you browse and manage network locations.
Network allows you to view the networks that your computer is attached to, and to access files and other resources available through those networks.
Connect to Server allows you to create connections to public or local networks.
The fourth section helps you quickly access any file on the system.
Search for files allows you to search for files stored on your computer.
Recent Documents lists the documents and folders recently accessed.
3.1.1.3. The System menu
This menu is divided into three subsections.
The first provides access to configuration tools.
The Preferences menu contains tools that affect only your account, and only require normal user access. These links include:
About Me stores details about yourself that you can share with other people as an electronic business card.
Appearance customizes the appearance of your desktop, including the background picture.
Assistive Technologies lets you choose software to magnify portions of the screen or to read the contents of screens to you.
Authorizations lets you selectively permit the software on your computer to carry out certain tasks automatically and without your intervention.
Bluetooth configures Bluetooth devices to work with your computer
Default Printer specifies the printer to use by default.
Desktop Effects enables or disables special visual effects for the desktop.
Display sets the resolution and other details of your display.
File Management controls how files and folders are presented to you.
Input Method allows you to choose methods to input languages whose writing systems do not use an alphabet, such as some Indic and East Asian languages.
Keyboard specifies the type of keyboard that you use with this computer.
Keyboard Shortcuts sets key combinations to perform certain tasks within certain programs, or within the desktop environment more generally.
Main Menu lets you add, remove, or re-order the items on the Applications and System menus, or create new menus of your own.
Mouse configures the buttons and other controls on your mouse.
Network Connections displays your computer's network connections and allows you to configure them.
Network Proxy allows you to specify a proxy server for your computer.
PalmOS Devices links your computer to personal digital assistants (PDAs) that use the PalmOS operating system.
Personal File Sharing lets you share your documents and other files with other users of this computer or with users of other computers over a network.
Power Management configures your computer to perform differently under different power settings.
Preferred Applications lets you choose which applications you prefer to use for particular tasks.
Remote Desktop permits you or other people to access your computer's desktop from a remote location over a network connection.
Screensaver sets your screensaver.
Software Updates specifies how you would like your computer to handle software updates when they become available.
Sound lets you choose sounds to accompany actions or events on your computer.
Startup Applications chooses applications to start automatically when you log in.
Windows controls the appearance of the windows that applications appear in.
The Administration menu contains tools that affect the whole system and require root access. These tools prompt for the root password when launched.
Add/Remove Software lets you change the software installed on the system.
Authentication allows you to control how the system verifies users who attempt to log in.
Bootloader lets you choose your default boot entry and the time the boot message is displayed.
Date and Time permits the system date and time to be changed.
Firewall link lets you setup and configure a firewall for your computer.
Language allows you to change the default language.
Logical Volume Management lets you configure the LVM in a graphical setting.
Network permits configuration of your network connections and devices.
Network Device Control lets you monitor and control your network devices.
Printing allows you to configure your printers.
Root Password lets you to change the root password for the system.
SELinux Management allows you to change security settings that protect your computer.
Services lets you decide which services will run when the system starts.
Software Sources permits you to enable or disable software repositories.
Update System looks for software updates at your selected software sources.
Users and Groups allows you to add or remove users and groups.
The second section provides access to the help documentation, along with information about the Fedora project, the GNOME project and information about your computer and its operating system.
Help is the guide for questions about GNOME.
About GNOME tells you about GNOME and the people who made it.
About Fedora is a guide containing documentation about the Fedora project.
About This Computer provides basic information about your computer and links to the process and resource monitor.
The third section contains entries to
Lock Screen starts the screen saver or blanks the screen. It will ask for your password to restore your session to the screen.
Log Out of the current session.
Shut Down gives you options to Hibernate, Restart, or Shut Down your computer.
Root password
When your computer asks for your root password it means you are entering an area that changes your system's operation or performance. Beware of the messages the program generates and be sure you really want to make the changes.
3.1.1.4. Application launchers
The series of icons next to the menus provide quick access to commonly used applications. These icons are called launchers.
The Mozilla Firefox icon
The icon for Mozilla Firefox, a web browser.
The Evolution icon
The icon for Evolution, a mail client and personal information manager.
The Tomboy icon
The icon for Tomboy, note-taking software.
To add more launchers to a panel, right-click on the panel and select Add to Panel. You can also add launchers that are in the Applications menu. Right click on the application you want to add and select Add this launcher to panel.
3.1.1.5. The notification area
The notification area displays icons that alert you to new events taking place on your computer. For example, your email program might display an icon here to indicate the arrival of new email, or your printer software might display an icon here to indicate that a document is now printing.
3.1.1.6. Volume control
The volume control allows you to quickly change the overall volume of sound on your computer. Click the icon to show a slider, and then use the mouse to drag the slider to the desired volume. If you double-click the icon, a volume control window appears in which you can separately change the volume of different sound sources.
3.1.1.7. The user switch area
If you click the current username located next to the clock, a list of available users appears. To switch to a different user account, select the username.
3.1.1.8. Clock and calendar
To access the calendar, click the clock on the right hand side of the panel. When you double-click a date, the Evolution personal information manager opens.
3.1.2. The desktop area
The default desktop area, or workspace, contains three icons:
the Computer icon. If you double-click this icon, a window appears that contains available storage devices on the computer. These are also listed in the Places > Computer menu.
the Home icon, which represents the location where all of the logged in user's files, such as music, movies, and documents, are stored by default. There is a different home directory for each user, and users cannot access each other's home directories by default.
the Trash icon. Normally, when you choose to delete a file, it is not permanently removed from your system. Instead, it is sent to the trash folder, which you can access from this icon. To permanently remove a file from your system, you must empty the trash. To empty the trash, right-click the icon and select Empty Trash.
Permanently deleting files
To bypass the trash and permanently delete a file, hold down the Shift key when deleting the file.
The Fedora Live CD desktop also includes an icon for installing Fedora to your hard disk. Additional icons may appear depending on your system. For example, inserting a USB stick will cause an icon to appear for accessing the stick.
3.1.2.1. Using the desktop
Right-click on the desktop area for a menu of actions related to the desktop area. For example, the Change Desktop Background action lets you choose a different image or photograph to display on the desktop. Add program icons to your desktop by a left click on the program's icon and select Add this launcher to desktop.
3.1.3. The window list panel
This panel has four components:
The Show Desktop button, on the left side, is used to hide all open windows, and reveal the desktop area. This function is useful when the open applications obscure an important desktop file or icon. To restore the windows, click the Show Desktop button again and all windows return to their previous location.
Any open applications appear as button icons in the middle part of the window list panel. It shows all application windows in use on the desktop workspace, whether they are visible or hidden. A hidden window button appears with a white background. The currently selected application window button has a gray background, and is said to have focus. Usually, this is the application whose window is on top of all the others on the screen. To switch from one running application to another using the mouse, click on the desired application's button in the panel.
Use the key combination AltTab to switch between open windows
Holding down the Alt key and pressing the Tab key will open a small window containing icons of all of your open windows. Repeatedly pressing the Tab key cycles through the icons. Release both keys on your selection to pull it to the front
The Workspace Switcher is the group of squares situated on the far right. They allow you to move between workspaces. Workspaces have long been a feature of UNIX and Linux desktop environments. Each workspace provides a separate desktop where applications can be organized, and a corresponding window list panel. By default there are four workspaces available. To change this number, right-click on the workspace switcher and choose preferences.
Switching between workspaces
Use the key combination Ctrl+Alt+Left Arrow or Ctrl+Alt+Right Arrow to switch between workspaces.
Hold down the Ctrl and Alt keys and press either the Left Arrow key or Right Arrow key to cycle through the available workspaces on your system.
The Trash icon on the right end of the window list panel works the same way as the Trash icon in the desktop area. If you delete a file, it is moved to this location. A right click on the Trash icon brings up the options to Open the folder, Empty Trash, Remove from Panel, and Lock to Panel.