|
 |
|
| |
Editing Ant buildfiles
Because Ant buildfiles are simple text files, any text editor
can be used to edit them. But there are several advantages to using the Eclipse
Ant editor, including syntax coloring, content assist, navigation, occurrence marking and an outline view. To
get familiar with the Eclipse
Ant editor
, create a simple Ant buildfile using
this editor.
- Create an Ant buildfile called
HelloWorld.xml.
- Open the
Ant editor
on the file by selecting Open With > Ant Editor
from the file's context menu.
Note: The default editor for a .xml file is a simple text
 Window > Preferences > General > Editors >File Associations
preference page.
Window > Preferences > General > Editors >File Associations
preference page.
- Enter the following content in the editor:
<?xml version="1.0" encoding="UTF-8"?>
<project name="Hello World" default="Hello" basedir=".">
  <property name="HelloText" value="Hello"/>
  <target name="Hello">
    <echo>${HelloText}</echo>
  </target>
</project>
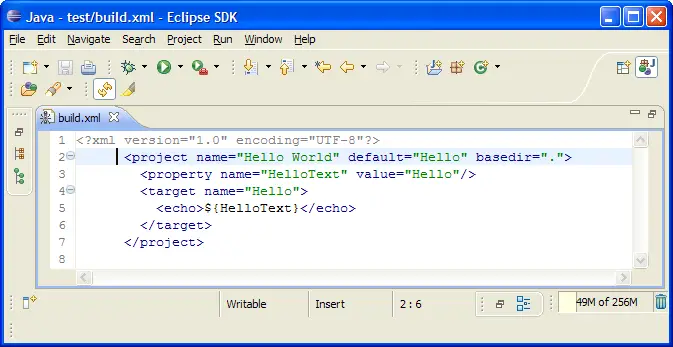
- Notice the syntax coloring for property values.
- Begin to enter a second target by typing
<tar, then hit Ctrl-Space
to activate content assist. A list of valid completions is presented. Select the <target> completion and
notice that the editor inserts both the opening and closing tags and leaves
the cursor positioned to enter attributes for this tag.
- Name this target
World.
- Enter an
echo task for this target similar to that for the Hello target,
but change the text to ${WorldText}.
- Add a dependency on the
World target from the Hello target. Place the cursor after the definition of the name attribute, hit Ctrl-Space
and select the depends attribute completion. Hit Ctrl-Space again to get the completion for the other target World in the buildfile.
- Save the buildfile contents.
- The full content will now be:
<?xml version="1.0" encoding="UTF-8"?>
<project name="Hello World" default="Hello" basedir=".">
  <property name="HelloText" value="Hello"/>
  <property name="WorldText" value="World"/>
  <target name="Hello">
    <echo>${HelloText}</echo>
  </target>

  <target name="World">
    <echo>${WorldText}</echo>
  </target>
  </project>
- Save the changes to
HelloWorld.xml.
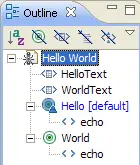
- Make the
Outline view
visible and notice that there are entries for each
property and each target. In addition, each task under a target has an entry.
- Clicking on an entry in the
Outline view
will scroll the editor to that
entry. In addition, when the
Outline view
has focus, typing a character will
move the selection in the view to the next visible entry beginning with that character.
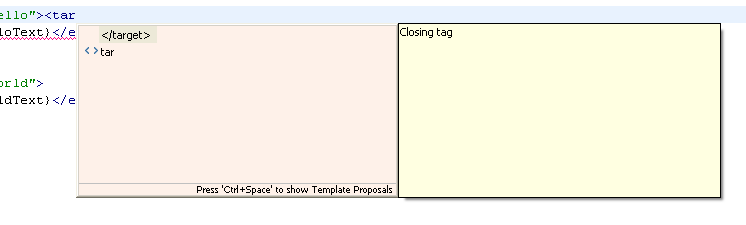
- Position the cursor just past the end of one of the
<target> tags,
type <tar, then hit Ctrl-Space to activate content assist. Notice that
now the only valid completions are the </target> and the tar tag. This is because the Ant editor
knows that nested targets are not allowed.
- Close the editor and do not save changes.

Creating Ant buildfiles
Running Ant buildfiles
Saving & Reusing Ant options
Running Ant buildfiles
Creating a project builder Ant buildfile
Ant buildfiles as project builders
Executing project builders
External tools
Non-Ant project builders
Stand-alone external tools
|
|
|


