How to create a custom widget?
Creating custom widgets in RAP is a hot topic and we see the need to
cover this in an article which you are just reading here. The main problem
is the distributed nature of RAP which requires that all components of your
custom widget have to play together and have some different aspects than
custom widgets in SWT.
You should be aware of the fact that there are two different types of custom widgets.
On the one side we have compounded widgets which is just an agglomeration of already
existing widgets. As this would be done in the same way like SWT we'll only care about
real custom widgets (you could use the term "owner drawn" in this case).
There are different tasks to create a new custom widget which will be covered here:
- create a widget which will be used on the server
- create the javascript libraries needed by the custom widget
- create an adapter to connect the widget with the RAP lifecycle
- register the javascript files
As an exemplary widget implementation we will use a component to show specific
locations in a map. Behind the scenes we will use the public API of Google maps. Let's
start with our first task - the server-side widget implementation.
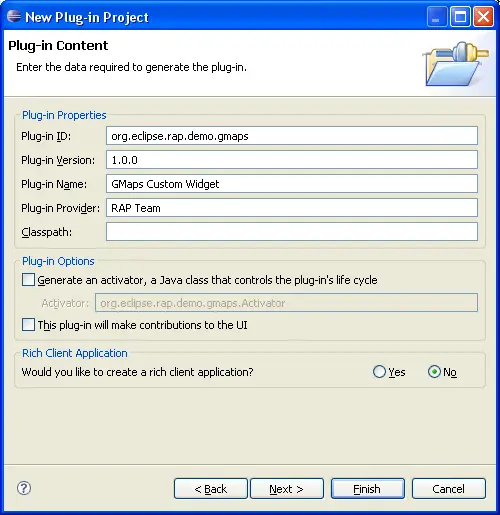
Creating the widget
To have a clear line between your application and your widgets we'll create a new plug-in
project called org.eclipse.rap.demo.gmaps. We don't need any additional
aspects like an RCP application or an activator.
The first step is to create a java class - the widget itself - to talk to the developer like
every other widget. In our case we will call it GMap.java in place it into the
org.eclipse.rap.gmaps package. As super class we use org.eclipse.swt.widgets.Composite
to have to have a proper base class which interacts with the rest of SWT. To store the address which
will be shown on the map, we create a new field in the GMap class called address
and will generate the corresponding setter and getter. The setter - setAdress( String ) - should
check for null values and replacing null with an empty string instead. It
should look like this in the end:
  public void setAddress( String address ) {
    if( address == null ) {
      this.address = "";
    } else {
      this.address = address;
    }
  }
To have an example for the other way around - from client to server - we introduce another
field called centerLocation to get the current location of the map when the
user moves it around. This is done by adding a new field to the class together with its
getter and setter:
  private String centerLocation;

  public void setCenterLocation( String location ) {
    this.centerLocation = location;
  }

  public String getCenterLocation() {
    return this.centerLocation;
  }
Additionally we override the setLayout(Layout) method of Composite
with an empty method as our custom widget does not contain any other widgets.
That's all for now - this is all needed by the developers who want to use our the custom widget.
Now it gets interesting as we have to work out the javascript side of our widget.
Client-side implementation
On the client side our widget is just a javascript class defined with the
qooxdoo syntax.
As super class we need to use at least
qx.ui.core.Widget.
To have an easier life we will directly use one of the
qooxdoo layout managers
as base of our widget. The code for the new qooxdoo class together with qooxdoos
CanvasLayout as super class will look like this:
  qx.Class.define( "org.eclipse.rap.gmaps.GMap", {
  extend: qx.ui.layout.CanvasLayout,
      // ...
  } );
The first thing we need to create is the constructor for that class in order to initialize our widget properly.
As parameter we have an
id which will be passed to the widget by us in a later step.
The first line is a base call which is the same as super in a java environment.
For now we populate the
id to the browsers DOM by adding a new HTML attribute with
setHtmlAttribute.
You see some Google Maps-specific calls here which are just there to initialize the Google Maps
subsystem. See the
Google Maps API Documentation
for more information.
The two
event listeners for the
qooxdoo widget will take care for the size calculations. This means that whenever the server
sets a new size for the widget we care about our widget to lay out everything inside
(in this case the map) correctly.
The called method
_doResize will be implemented later.
  qx.Class.define( "org.eclipse.rap.gmaps.GMap", {
  extend: qx.ui.layout.CanvasLayout,

    construct: function( id ) {
      this.base( arguments );
      this.setHtmlAttribute( "id", id );
      this._id = id;
      this._map = null;
      if( GBrowserIsCompatible() ) {
        this._geocoder = new GClientGeocoder();
        this.addEventListener( "changeHeight", this._doResize, this );
        this.addEventListener( "changeWidth", this._doResize, this );
      }
    }

  } );
To save the address of the widget somewhere we use the
property system of qooxdoo.
Adding a new property will look like this:
  qx.Class.define( "org.eclipse.rap.gmaps.GMap", {
  extend: qx.ui.layout.CanvasLayout,
      construct: function( id ) {
        // ...
      },  // <-- comma added, see javascript syntax reference

      properties : {
        address : {
          init : "",
          apply : "load"
        }
      }

    }
  } );
Qooxdoo will automatically generate the corresponding setter and getter at runtime for us.
So if we want to read the current address of our client-side widget we just need to call
getAdress on a our client-side GMap object. As you see in the
apply attribute
of your address property the method
load will be called when the value of the
property changes. So let's implement it:
  qx.Class.define( "org.eclipse.rap.gmaps.GMap", {
  extend: qx.ui.layout.CanvasLayout,
      construct: function( id ) {
        // ...
      },

      properties : {
        // ...
      },  // <-- comma added, see javascript syntax reference

      members : {
        _doActivate : function() {
            var shell = null;
            var parent = this.getParent();
            while( shell == null && parent != null ) {
                if( parent.classname == "org.eclipse.swt.widgets.Shell" ) {
                    shell = parent;
                }
                parent = parent.getParent();
            }
            if( shell != null ) {
                shell.setActiveChild( this );
            }
        },

        load : function() {
            var current = this.getAddress();
            if( GBrowserIsCompatible() && current != null && current != "" ) {
                qx.ui.core.Widget.flushGlobalQueues();
                if( this._map == null ) {
                    this._map = new GMap2( document.getElementById( this._id ) );
                    this._map.addControl( new GSmallMapControl() );
                    this._map.addControl( new GMapTypeControl() );
                    GEvent.bind( this._map, "click", this, this._doActivate );
                    GEvent.bind( this._map, "moveend", this, this._onMapMove );

                }
                var map = this._map;
                map.clearOverlays();
                this._geocoder.getLatLng(
                current,
                function( point ) {
                    if( !point ) {
                        alert( "'" + current + "' not found" );
                        } else {
                        map.setCenter( point, 13 );
                        var marker = new GMarker( point );
                        map.addOverlay( marker );
                        marker.openInfoWindowHtml( current );
                    }
                }
                );
            }
        },

        _onMapMove : function() {
            if( !org_eclipse_rap_rwt_EventUtil_suspend ) {
                var wm = org.eclipse.swt.WidgetManager.getInstance();
                var gmapId = wm.findIdByWidget( this );
                var center = this._map.getCenter().toString();
                var req = org.eclipse.swt.Request.getInstance();
                req.addParameter( gmapId + ".centerLocation", center );
            }
        },

        _doResize : function() {
            qx.ui.core.Widget.flushGlobalQueues();
            if( this._map != null ) {
                this._map.checkResize();
            }
        }
      }

  } );
There is a little hack involved which is easily explained. We need to listen to click
events in the map and connect them with our _doActivate method to activate
the current shell. This is needed because Google Maps API is implemented with an IFrame
and current browser generations send events only to their document. The IFrame is handled
as a separate document and thus we cannot catch the events to let the shell be activated with
the standard mechanism. This is obsolete for custom widgets without IFrames.
The other event listener for the moveend event will trigger a function to send
the current location of the map to the server. Therefore we need to get the Id - which is
allocated by RAP - of the current widget and obtained via the WidgetManager on the client side.
Then we use the current Request object to add a new parameter which will be
processed later at the server side. If you want to immediately send the parameter to the server
use req.send(). But as we don't need this for now we just add the parameter
to the request object and it will be transfered automatically to the server with the next request.
Ok, we're almost done with our client-side implementation. But the key part of the whole widget
is still missing: the piece between the server and the client.
Note: The qooxdoo build
which gets delivered with RAP is not the same qooxdoo you'll
find on their
webpage. We stripped it down to
have the best mix between needed functionality and size. So there may be
classes which are available in plain qooxdoo but not in the version of RAP.
Filling the gap between client and server
In our current situation we have already done two important tasks: the server-
and the client-side widget. Now we need to connect each other in order to
control the widget on the client by calling it on the server (where our
application lives).
In RAP - more precisely in RWT - we have a concept called the life cycle. With each request
from the client the life cycle on the server side will be executed. It is responsible to process
all changes and events from the client and in the end it will send back a response to the client
what to do (mostly hide/show widgets, update data, etc).
The life cycle itself is splitted up in several phases which are executed in a specific order.
| Phase |
Description |
| ReadData |
This is responsible to read the values sended from the client like occurred events.
At the end of this phase, all widget attributes are in sync again with the values on the client.
The attributes are preserved for later use. |
| ProcessAction |
ProcessAction is responsible for dispatching the events to the widgets. Attributes may
change in this phase as a response for the events. |
| Render |
At the end of the lifecycle every change will be rendered to the client.
Be aware that only values which are different than there preserved ones are send to
the client (means: only the delta). |
To participate in the life cycle - what is what we want to do with our custom widget -
we need to provide a Life Cycle Adapter (LCA). There are two ways to connect the LCA
with our widget. On the one hand side we can return it directly when someone asks our widget
with getAdapter to provide an LCA. This can be done by implementing the
getAdapter method in our own widget like this:
  ...
  public Object getAdapter( Class adapter ) {
    Object result;
    if( adapter == ILifeCycleAdapter.class ) {
      result = new MyCustomWidgetLCA(); // extends AbstractWidgetLCA
    } else {
      result = super.getAdapter( adapter );
    }
    return result;
  }
  ...
The preferred way is to let RAP do this itself by creating the LCA class in a
package called <widgetpackage>.internal.<widgetname>kit.<widgetname>LCA.
The order of the internal does not play the big role. The important thing is
to have internal in the package name, the package with the LCA is called
kit and the LCA itself is called LCA.
Here a little example:
If our widget is named org.eclipse.rap.gmaps.GMap,
then our LCA should be named org.eclipse.rap.internal.gmaps.gmapkit.GMapLCA.
The LCA class itself must have org.eclipse.rwt.lifecycle.AbstractWidgetLCA
as the super class and implement its abstract methods.
We'll just show you a little overview of the methods and their role and then
go further to implement a working LCA for our GMaps widget.
| Method name |
Description |
renderInitialization(Widget)
|
This method is called to initialize your widget. Normally you will
tell RAP which client-side class to use and how it is initialized
(think of style bits) |
preserveValues(Widget)
|
Here we have to preserve our values so we can see at the end of
the lifecycle if something has changes during the process action
phase. |
renderChanges(Widget)
|
That's the most interesting part. We need to sync the attributes of the
widget on the server with the the client-side implementation by sending
the changes to the client. |
renderDispose(Widget)
|
You can tidy up several things here before the widget gets disposed
of on the client. |
After having a brief overview of the principles of the Life Cycle Adapter let's start
by implementing the LCA for our GMap widget.
After creating the LCA class - which extends AbstractWidgetLCA - we will fill the interesting
methods with some logic. First comes the initialization.
  public void renderInitialization( Widget widget ) throws IOException {
    JSWriter writer = JSWriter.getWriterFor( widget );
    String id = WidgetUtil.getId( widget );
    writer.newWidget( "org.eclipse.rap.gmaps.GMap", new Object[] { id } );
    writer.set( "appearance", "composite" );
    writer.set( "overflow", "hidden" );
    ControlLCAUtil.writeStyleFlags( ( GMap )widget );
  }
Basically the class JSWriter is responsible for transforming our java calls
and setters into the corresponding javascript which gets transfered to the client.
The JSWriter is also responsible to only write out changes which are different
than their preserved value. For each widget you have an own JSWriter instance
so RAP can decide to which widget the call belongs.
As you can see in the snippet, JSWriter#newWidget is called to create a new widget
on the client side. The second parameters is an array of Objects which are
passed to the constructor of the qooxdoo class (see above).
With JSWriter#set you can easily set different attributes of your qooxdoo object.
This could also be done in Javascript and is just a showcase in here.
The next step is to preserve our values therewith RAP can decide in the next request if there
has something changed in the meantime. As we just have the address which could change this is
relative straight forward.
  private static final String PROP_ADDRESS = "address";

  public void preserveValues( Widget widget ) {
    ControlLCAUtil.preserveValues( ( Control )widget );
    IWidgetAdapter adapter = WidgetUtil.getAdapter( widget );
    adapter.preserve( PROP_ADDRESS, ( ( GMap )widget ).getAddress() );

    // only needed for custom variants (themeing)
    WidgetLCAUtil.preserveCustomVariant( widget );
  }
First we use ControlLCAUtil#preserveValues to have most of the work done
by the framework. It's responsible for preserving values like tooltip, tabindex, size, etc.
So we only need to care about the things implemented in our widget.
We just request a so called IWidgetAdapter which is responsible for different
aspects in the lifecycle of a widget. In this case we only use it to preserve the address value
with a predefined key (PROP_ADRESS) to associate it later.
The last line calling preserveCustomVariant is only added for the sake of completeness.
Variants is a way to have different looks of the same widget and is part of the
theme engine provided by RAP. Please see the
Prepare Custom Widgets for Theming
article for more informations about theming a custom widget.
The following step is one of most interesting parts of your lifecycle adapter - the
renderChanges method. As said before it is responsible to write every
change to the outgoing stream which is executed on the client. Let's take a look at the
implementation:
  private static final String JS_PROP_ADDRESS = "address";

  public void renderChanges( Widget widget ) throws IOException {
    GMap gmap = ( GMap )widget;
    ControlLCAUtil.writeChanges( gmap );
    JSWriter writer = JSWriter.getWriterFor( widget );
    writer.set( PROP_ADDRESS, JS_PROP_ADDRESS, gmap.getAddress() );

    // only needed for custom variants (themeing)
    WidgetLCAUtil.writeCustomVariant( widget );
  }
Again we use the ControlLCAUtil to write the changes which are implemented on
Control and thus we should not care what's behind it (for those who really want to know it -
it's the same as preserving the values like tooltip, tabindex, size, etc).
Like in the widget initialization we have to render something and therefore we
need to obtain the corresponding JSWriter instance for our widget. We need to use
JSWriter#set to set a specific attribute to the widget instance on the client-side.
There are many different set implementations available for every need. The one used
here is simple: We pass the key for the preserved value to the method so RAP can check if there has
something changed since the last time it was preserved, we pass the name of the client-side attribute
which gets transformed into "set*" and last but not least the value for this setter.
As we can see, the name of the javascript attribute (JS_PROP_ADRESS) will call the method
setAdress on the corresponding widget instance on the client. If you wonder where this
method is, take a look at the qooxdoo property system. The address property of our widget will be transformed
by qooxdoo into a set* and get* methods at runtime.
Now we need to process the actions transfered to the server (at least if there are any).
We see in the GMap.js that if the user moves the map a new parameter called
centerLocation will be attached to the current request and transfered to the
server. To read and process it the readData method of the LCA is used.
  private static final String PARAM_CENTER = "centerLocation";

  public void readData( Widget widget ) {
    GMap map = ( GMap )widget;
    String location = WidgetLCAUtil.readPropertyValue( map, PARAM_CENTER );
    map.setCenterLocation( location );
  }
As you can see, it's really easy. You just need to ask the WidgetLCAUtil#readPropertyValue
for the parameter and pass it to the server-side widget implementation. If you wonder why the
center location does not get written in the renderChanges method we implemented above:
This will be your task at the end of the tutorial.
Normally you won't have public methods for attributes which are not changeable programmatically.
For this you would use an adapter or another mechanism to implement the setter behind the scenes.
At the end of the tutorial it is your task hide the public setCenterLocation
method of the GMap widget or - even better - to implement the rendering of
the center location yourself.
The last step is to implement the way our widget is disposed on the client. Normally there is no
need to care for anything else and this is also the case with our GMap widget. If you really have
to do any other stuff like calling specific methods before the widget is disposed you should do it
here.
  public void renderDispose( Widget widget ) throws IOException {
    JSWriter writer = JSWriter.getWriterFor( widget );
    writer.dispose();
  }
There are now two additional methods called createResetHandlerCalls and
getTypePoolId. These were introduced by a mechanism that helps to soften the massive
memory consumption on the client. Many of the client-side widgets are not thrown away
anymore, but kept in an object pool for later reuse. Especially with long-running
applications in the Internet Explorer browser, this can make a huge difference. Please
note that this topic is work in progress and, despite extensive
testing, might lead to errors under different circumstances. We recommend not to use this
in your custom widgets.
Registering the javascript files
Loading the client application (with our widget) in a browser will still lead to problems
as nobody knows about the javascript resources and where to find them. We can fix this
by using the org.eclipse.rap.ui.resources extension point. We add two new extensions,
one for our custom widget javascript file and one for the external javascript library of Google
Maps.
  <plugin>
    <extension
      id="org.eclipse.rap.gmaps.gmap"
      point="org.eclipse.rap.ui.resources">
        <resource class="org.eclipse.rap.gmaps.GMapResource"/>
        <resource class="org.eclipse.rap.gmaps.GMapAPIResource"/>
    </extension>
  </plugin>
Both classes refer to an implementation of org.eclipse.rwt.resources.IResource.
The first one - our custom widget itself - is really easy to implement. We just need to tell
RAP that it is a javascript file, where it can find the file and which charset to use. So the
IResource>
implementation for the widget javascript could look like this:
  public class GMapResource implements IResource {

    public String getCharset() {
      return "ISO-8859-1";
    }

    public ClassLoader getLoader() {
      return this.getClass().getClassLoader();
    }

    public RegisterOptions getOptions() {
      return RegisterOptions.VERSION_AND_COMPRESS;
    }

    public String getLocation() {
      return "org/eclipse/rap/gmaps/GMap.js";
    }

    public boolean isJSLibrary() {
      return true;
    }

    public boolean isExternal() {
      return false;
    }
  }
For the charset we need to return a string to describe the charset. If you're not sure
you can use of the constants defined in org.eclipse.rwt.internal.util.HTML but be
aware that this is internal. The getOptions method specifies if the file should
be delivered with any special treatment. Possible ways are NONE, VERSION,
COMPRESS and VERSION_AND_COMPRESS. VERSION means that
RAP will append a hash value of the file itself to tell the browser if he should use an already
cached version or reload the file from the server. With the COMPRESS option RAP will
remove all unnecessary stuff like blank lines or comments from the javascript file in order
to save bandwidth and parse time.
Remote files like our next task - the Google Maps library - are handled a little bit different.
  public class GMapAPIResource implements IResource {

    private static final String KEY_SYSTEM_PROPERTY = "org.eclipse.rap.gmaps.key";

    // key for localhost rap development on port 9090
    private static final String KEY_LOCALHOST
    = "ABQIAAAAjE6itH-9WA-8yJZ7sZwmpRQz5JJ2zPi3YI9JDWBFF"
        + "6NSsxhe4BSfeni5VUSx3dQc8mIEknSiG9EwaQ";

    private String location;

    public String getCharset() {
      return "ISO-8859-1";
    }

    public ClassLoader getLoader() {
      return this.getClass().getClassLoader();
    }

    public RegisterOptions getOptions() {
      return RegisterOptions.VERSION;
    }

    public String getLocation() {
      if( location == null ) {
        String key = System.getProperty( KEY_SYSTEM_PROPERTY );
        if( key == null ) {
          key = KEY_LOCALHOST;
        }
        location = "https://maps.google.com/maps?file=api&v=2&key=" + key;
      }
      return location;
    }

    public boolean isJSLibrary() {
      return true;
    }

    public boolean isExternal() {
      return true;
    }
  }
To tell RAP to load external resources we just need to return true in
isExternal. The location should be a valid URL where the resource resides.
In this case it's loaded from the Google Maps server with a special API key. This is specific
for the Google Maps widget and is not needed by other widgets. If you're planning to use
or extend this sample widget we encourage you to get your
own API key for Google as this key
will only work on https://localhost:9090/rap. With every other combination of host, port or
servletName you need to obtain a new key. Additionally we implemented a system property
to define the key without recompiling the widget.
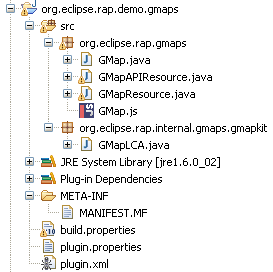
We've just finished our custom widget and our project structure should look like this if we have done everything right.
Test the widget
In order to test the widget we will create a new plug-in project with the following entrypoint:
  public class GMapDemo implements IEntryPoint {

    public int createUI() {
      Display display = new Display();
      Shell shell = new Shell( display, SWT.SHELL_TRIM );
      shell.setLayout( new FillLayout() );
      shell.setText( "GMaps Demo" );

      GMap map = new GMap( shell, SWT.NONE );
      map.setAddress( "Stephanienstra�e 20, Karlsruhe" );

      shell.setSize( 300, 300 );
      shell.open();
      while( !shell.isDisposed() ) {
        if( !display.readAndDispatch() ) {
          display.sleep();
        }
      }
      return 0;
    }
  }
Don't forget to add org.eclipse.rap.ui and the GMap widget project as dependencies.
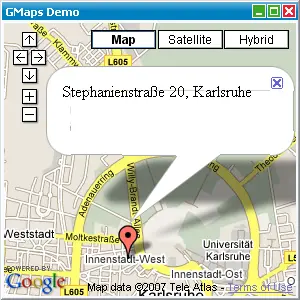
Then we need to register our entry point via the org.eclipse.rap.ui.entrypoint. If
everything went well our demo should look like this after starting the server:
But there was more: the center location we sended to the server. To read it out, we extend the sample
with a new button:
  public class GMapDemo implements IEntryPoint {

    public int createUI() {
      Display display = new Display();
      final Shell shell = new Shell( display, SWT.SHELL_TRIM );
      shell.setLayout( new FillLayout() );
      shell.setText( "GMaps Demo" );

      GMap map = new GMap( shell, SWT.NONE );
      map.setAddress( "Stephanienstra�e 20, Karlsruhe" );

      Button button = new Button( shell, SWT.PUSH );
      button.setText( "Tell me where I am!" );
      button.addSelectionListener( new SelectionAdapter() {
        public void widgetSelected( SelectionEvent e ) {
          String msg = "You are here: " + map.getCenterLocation()
          MessageDialog.openInformation( shell, "GMap Demo", msg );
        }
      });

      shell.setSize( 300, 300 );
      shell.open();
      while( !shell.isDisposed() ) {
        if( !display.readAndDispatch() ) {
          display.sleep();
        }
      }
      return 0;
    }
  }
After a click on the button the current location will be sended to the server (together
with the selection event of the button), applied to the widget with the help of our LCA
and shown by the MessageDialog. Great!
And now?
You completed your first custom widget - congratulations!
Before implementing a heavy custom control we like to give you some tasks to play around
with the GMap widget.
- Implement the rendering for the center location to programmatically set it
- Add support for
markers
- Implement other nice things by connecting Google Maps with RAP
We are delight in seeing what you can do with this little widget. If you
have problems, take a look at all the LCAs already provided by RAP. It's
not black magic.
Troubleshooting
There may be times where you need to track down a javascript error in your custom widget.
As the tooling support for javascript is not that mature as for java we provide some
little undertakes to help you debugging your custom widget.
Client library variants
As we do many improvements regarding speed of the underlying qooxdoo library the
normally used javascript fragment is compressed and cleaned from any comment in the
code. As it is easier to develop with a full-blown version of qooxdoo to debug
it you can specify -Dorg.eclipse.rwt.clientLibraryVariant=DEBUG as
VM parameter.
Client log level
To see debug messages and exceptions which occured during javascript execution
you can turn on the client-side debugging mode with
-Dorg.eclipse.rwt.clientLogLevel=<LEVEL> where <LEVEL>
is one of the following values:
- OFF
- ALL
- WARNING
- INFO
- SEVERE
- FINE
- FINER
- FINEST
When developing custom widget we recommend to use the level ALL to
see every debug message.


