Workbench under the covers
The workbench provides an extensive set of classes and interfaces for building complex user interfaces. Fortunately you don't need to understand
all of them to do something simple. We'll start by looking at some concepts that are exposed in the workbench user interface
and their corresponding structure under the covers.
Workbench
We've been using the term workbench loosely to refer to "that window that opens when you start the platform." Let's drill down a little and look at some of the visual components that make up
the workbench.
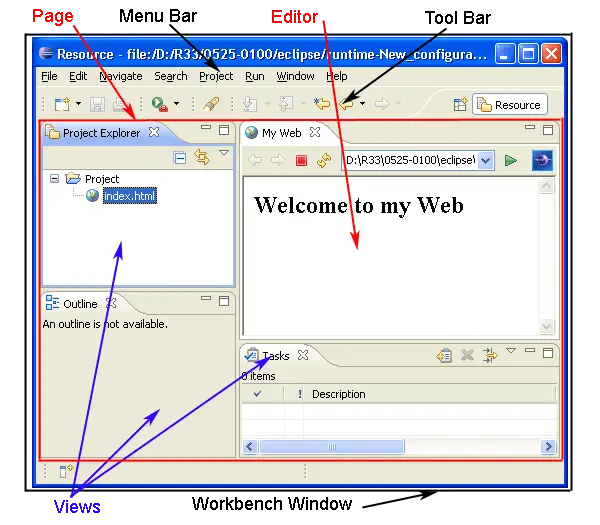
For the rest of this discussion, when we use the term workbench, we will be referring to the workbench window
(
IWorkbenchWindow
). The workbench window is the top-level window in a workbench. It is the frame that holds the menu bar,
tool bar, status line, short cut bar, and pages. In general, you don't need to program to the workbench window. You just want to know that it's there.
Note: You can open multiple workbench windows; however each workbench window is a self-contained world of editors and views,
so we'll just focus on a single workbench
window.
From the user's point of view, a workbench contains views and editors. There are a few other classes used to implement the workbench window.
Page
Inside the workbench window, you'll find one page (
IWorkbenchPage
) that in turn contains parts. Pages are an implementation mechanism for grouping parts. You typically don't need to program to the page, but you'll see it in the context of programming and debugging.
Perspectives
Perspectives provide an additional layer of organization inside the workbench
page. A perspective defines an appropriate collection of views, their
layout, and applicable actions for a given user task. Users can switch
between perspectives as they move across tasks. From an
implementation point of view, the user's active perspective controls which views
are shown on the workbench page and their positions and sizes. Editors are
not affected by a change in perspective.
Views and editors are where we move beyond implementation details into some common plug-in programming. When you add a visual component to the workbench, you must decide whether you want to implement a view or
an editor. How do you decide this?
- A view is typically used to navigate a hierarchy of information,
open an editor, or display properties for the active editor. For example,
the project explorer view allows you to navigate the workspace hierarchy.
The properties and outline views show information about an object
in the active editor. Any modifications that can be made in a view (such
as changing a property value) are saved immediately.
- An editor is typically used to edit or browse a document or input
object. Modifications made in an editor follow an open-save-close
model, much like an external file system editor. The platform text
editor and Java editor are examples of workbench editors.
In either case, you will be building your view or editor according to a common lifecycle.
-
You implement a createPartControl method to create the SWT widgets that represent your visual component. You must determine which widgets to use and allocate any related UI resources needed to display your view or editor.
-
When your view or editor is given focus, you'll receive a setFocus notification so that you can set the focus to the correct widget.
-
When the view or editor is closed, you will receive a dispose
message to signify that the view or editor is being closed. At this point
the controls allocated in createPartControl
have already been disposed for you, but you must dispose of any graphics resources (such
as cursors, icons, or fonts) that you allocated for the view or editor.
Throughout this lifecycle, events will fire from the containing workbench page to notify interested parties about the opening, activation, deactivation, and closing of the
views and editors.
Seem simple? It can be. That's the beauty of workbench views and editors. They're just widget holders, and can be as simple or complex as you need them to be. We saw the simplest of views earlier when we built a hello world view.
Let's look at it again now that we've explained more about what's going on.
   package org.eclipse.examples.helloworld;

   import org.eclipse.swt.widgets.Composite;
   import org.eclipse.swt.widgets.Label;
   import org.eclipse.swt.SWT;
   import org.eclipse.ui.part.ViewPart;

   public class HelloWorldView extends ViewPart {
      Label label;
      public HelloWorldView() {
      }
      public void createPartControl(Composite parent) {
         label = new Label(parent, SWT.WRAP);
         label.setText("Hello World");
      }
      public void setFocus() {
         // set focus to my widget.  For a label, this doesn't
         // make much sense, but for more complex sets of widgets
         // you would decide which one gets the focus.
      }
   }
Notice that we didn't have to implement a dispose() method since we didn't do anything but create a label in the
createPartControl(parent) method. If we had allocated any UI resources, such as images or fonts, we would have disposed of them here. Since we extended the
ViewPart
class, we inherit the "do nothing" implementation of
dispose().


