Creating the plug-in project
You can use any Java IDE you wish to build Eclipse plug-ins, but of course the
Eclipse SDK provides tooling specific for plug-in development. We'll walk
through the steps for building our plug-in with the Eclipse SDK, since this is the
typical case. If you are not already familiar with the Eclipse workbench and the Java IDE,
consult the Java development user guide or PDE guide for further explanations of the steps
we are taking. For now we are focusing on the code, not the tool;
however, there are some IDE logistics for getting started.
Creating your plug-in project
You will need to create a project that contains your work. We'll take advantage of some of the
code-generation facilities of the Plug-in Development Environment (PDE) to give us a template to
start from. This will set up the project for writing Java code and generate the default plug-in
manifest files (explained in a moment) and a class to hold our view.
- Open the New Project... wizard
File > New > Project...
)
and choose Plug-in Project from the Plug-in Development category
and click Next.
- On the Plug-in Project page, use com.example.helloworld
as the name for your project and check the box for Create a Java project
(this should be the default). Leave the other settings on the page with their default
settings and then click Next to accept the default plug-in project structure.
- On the Plug-in Content page, look at the default settings. The wizard sets com.example.helloworld
as the id of the plug-in. The wizard will also generate a plug-in class for your plug-in and allow you to supply additional information about
contributing to the UI. These defaults are acceptable, so click Next.
- On the Templates page, check the box for Create a plug-in using one of the templates. Then
select the Plug-in with a view template. Click Next.
- We want to create a minimal plug-in, so at this point we need to change the default settings to keep things as
simple as possible. On the Main View Settings page, change the suggested defaults as follows:
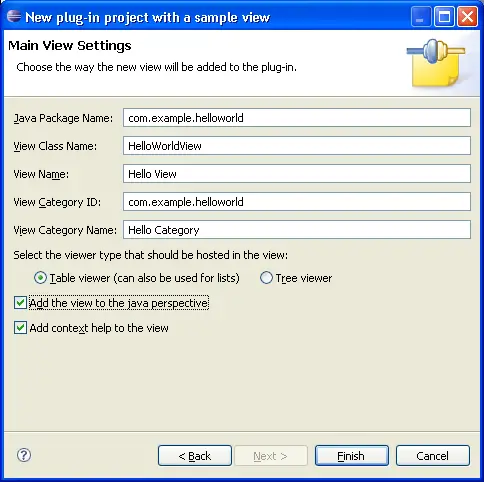
- Change the Java Package Name from com.example.helloworld.views to com.example.helloworld
(we don't need a separate package for our view).
- Change the View Class Name to HelloWorldView.
- Change the View Name to Hello View.
- Leave the default View Category Id as com.example.helloworld.
- Change the View Category Name to Hello Category.
- Leave the default viewer type as Table viewer (we will change this in the code to make it even simpler).
- Uncheck the box for Add the view to the resource perspective.
- Click Next to proceed to the next page.
- On the View Features page, uncheck all of the boxes so that no extra
features are generated for the plug-in. Click Finish to create the project and the plug-in skeleton.
- When asked if you would like to switch to the Plug-in Development perspective,
answer Yes.
- Navigate to your new project and examine its contents.
The skeleton project structure includes several folders, files, and a Java package. The important files at this stage are the
plugin.xml and MANIFEST.MF (manifest) files and the Java source code for your plug-in.
We'll start by looking at the implementation for a view and then
examine the manifest files.


