WTP Tutorials - JavaServer Faces Tools Tutorial
Summary
In this tutorial we will build and execute a JavaServer Faces
application, and highlight the features contributed by the JSF Tools
Project.
By Raghu Srinivasan, Oracle Corporation.
June 15, 2009
Introduction
In this tutorial we will create and execute a web application
with JavaServer Faces capabilities. The WTP JSF Tools project has
provided features that simplifies application building, configuration
and execution. These include the Web Page Editor for visually editing a
JSF-JSP web page, syntactic and semantic validation of a JSF-JSP page,
the Faces Configuration Editor for editing the application configuration
resource file.
You may wish to visit Building
and Running a Web Application before attempting this tutorial. That
tutorial covers setup of the server instance that this tutorial does
not.
Setup
Make the Web Page Editor the default editor for JSP pages
The JSF Tools Project-contributed Web Page Editor (WPE) is NOT
registered as the default editor for JSP files. You can make the WPE the
default editor for JSP files by following these steps:
- Navigate to "Window" -> "Preferences..." -> "General"
-> "Editors" -> "File Associations"
- In the "File types" section, select "*.jsp"
- In the "Associated editors" section, select "Web Page Editor"
- Select the "Default" button
Create a JavaServer Faces Project
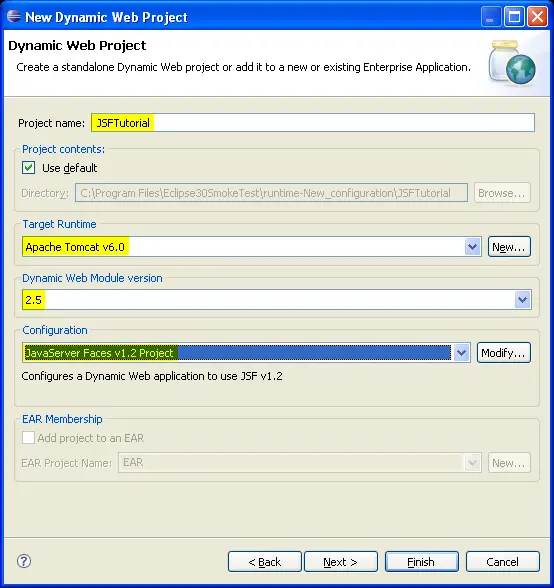
Create a New Dynamic Web Application with the name of JSFTutorial.
Set the target runtime to the Apache Tomcat 6.0
In the configuration section, select the JavaServer Faces
Project v1.2. Skip the next two panels to get to the JSF Capabilities
page.
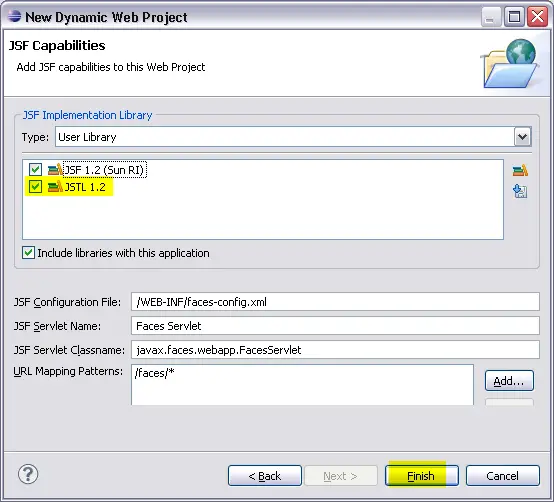
On the JSF Capabilities page, from the drop-down for the Type of
the JSF Library, select User Library.
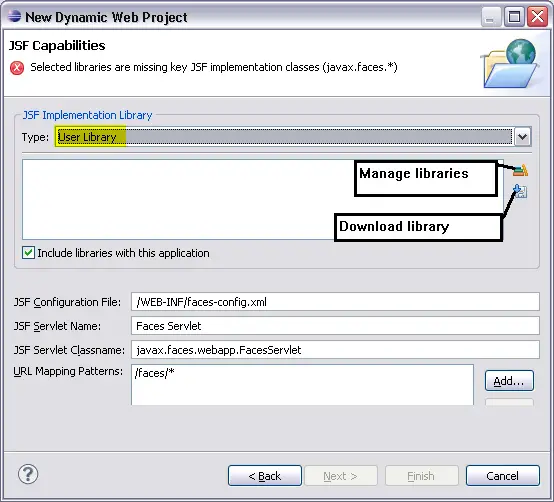
Click on the Download library icon.
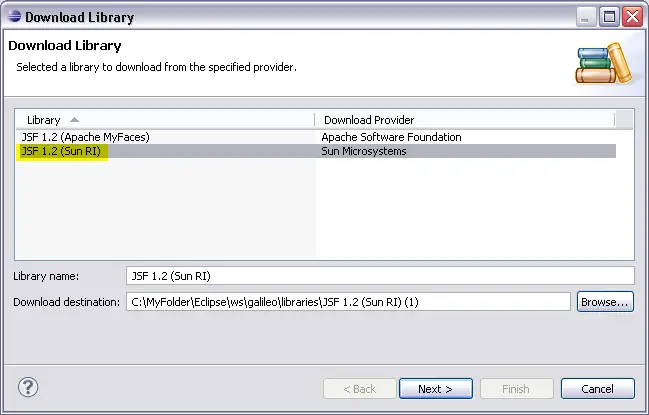
The Download Library dialog is displayed with the list of providers for
the JSF implementation JAR files. Select the library from Sun
Microsystem. Click Next. Accept the license and hit Finish
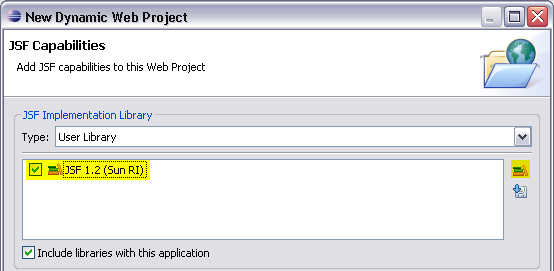
The tool downloads the JAR files, creates a JDT User Library and adds it to the current project. Select the checkbox for the new library if it is not selected. Next, select the
Manage libraries icon.
Create a JDT User Library to hold the JSTL jar file. Seelct
OK.
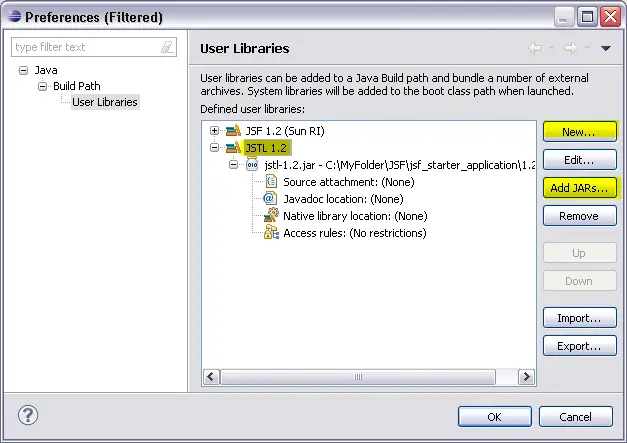
The JSTL library is displayed in the JSF Capabilities dialog. Select the libray and hit
Finish
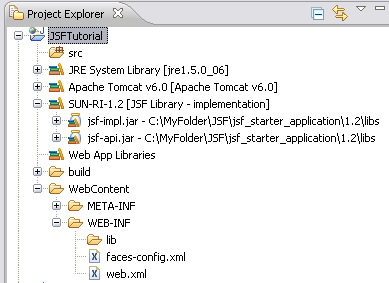
Your JSF application has been created. Note that the web.xml file
has been updated with the Faces Servlet and servlet-mapping, a stub JSF
application configuration file (faces-config.xml) has been created, and
the build path has been updated with the implementation jars.
 If you
have an existing Dynamic Web Application, it is possible to add JSF
capabilities by going to:
If you
have an existing Dynamic Web Application, it is possible to add JSF
capabilities by going to:
Project Properties > Project Facets > Add\Remove Project
Facets…
Create a JSF JSP Page
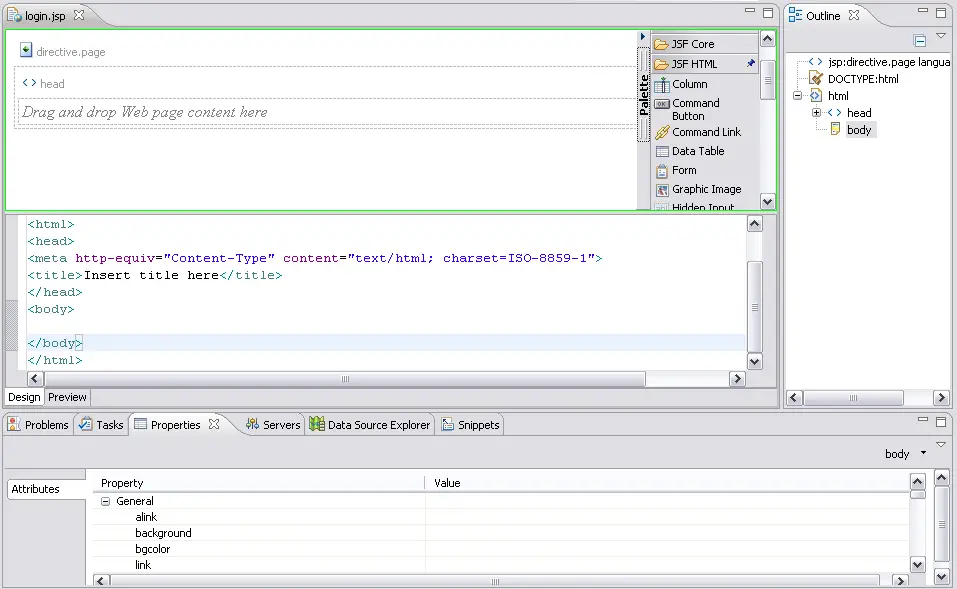
Use the JSP Page wizard to create a page called login.jsp
in the Web Content folder of the new application. In the Select
Templates page of the wizard, select the New JSP(html) template.
Click Finish. The page will be opened in the Web Page Editor as shown
below
Open the Properties View. Right-mouse click on the designer canvas and
from the context menu, select Show->Properties. Wait for the "Reading
Properties" dialog to disappear.
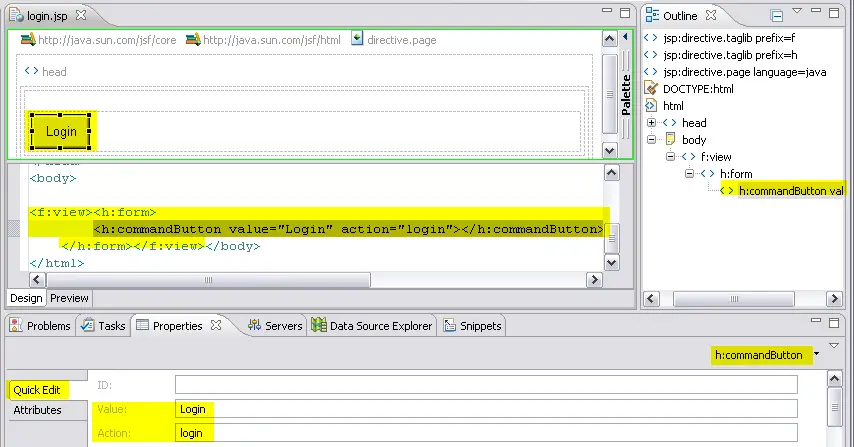
Add a CommandButton to the canvas.
- In the Palette View, click on the section JSF
HTML to display the list of components.
- Drag-and-drop the CommandButton to the canvas. Note that the
editor wraps the CommandButton with <f:view> and <h:form>
tag.
- In the properties view, click on Quick Edit.
- Set the Value attribute to Login.
- Set the Action attribute to login
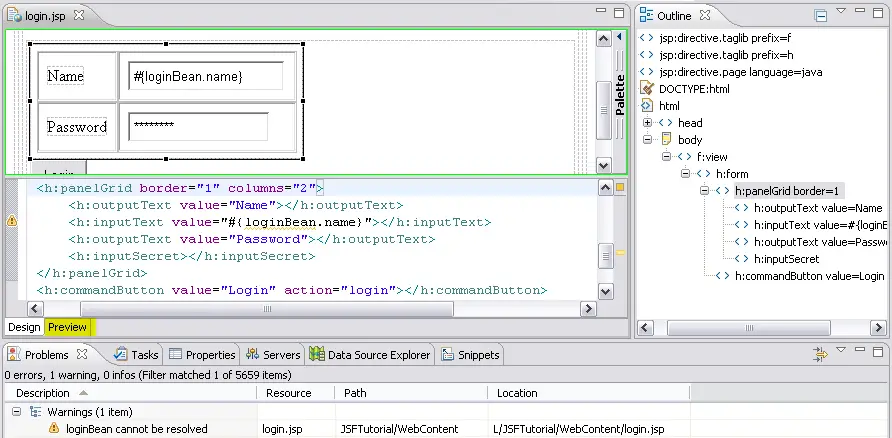
Add a PanelGrid
- From the Palette View, Drag-and-drop the PanelGrid to the
canvas. Notice the feedback on the drop target.
- Drop the Panel Grid before the Command Button, but inside the
Form tag. The Panel Grid is created with a predefined set of OutputText
components.
Modify the components inside the Panel Grid
- Click on the OutputText Item2 and hit Delete
- Add a InputText (Text Input in the Palette view) tag after Item1
and before Item3
- Delete the OutputText, Item 4
- Add a InputSecret (Secret Input in the Palette view) tag after
Item3
- Click on the OutputText, Item1. Change its value in the
Source View to Name
- Click on the OutputText, Item3. Change its value in the
Source View to Password
- Click on the Preview tab to see the page rendered in a
browser
- Click on the InputText tag next to Name. In the
Property View, set the value attribute to #{loginBean.name}.
- Save the page. The editor will flag a warning indicating that
the variable, loginBean cannot be resolved.
In the Project Explorer, expand the node, JSFTutorial->WebContent.
Double-click on
faces-config.xml
. This will launch the Faces Configuration editor. Select the
ManagedBean
tab.
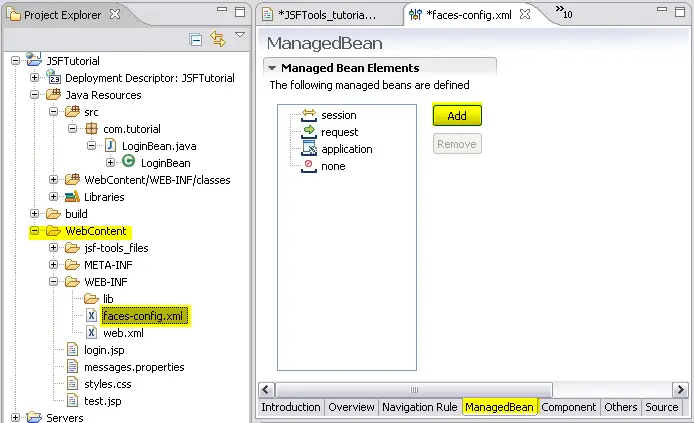
Click on the
Add
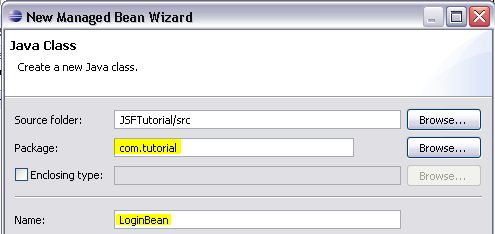
button. This will launch the New Managed Bean wizard. Select the option,
Create a new Java class
. In the next wizard panel, enter the package as,
com.tutorial
and the Name of the class as
LoginBean
. Click the Finish button.
This will create the Java class and register it as a managed bean. Save
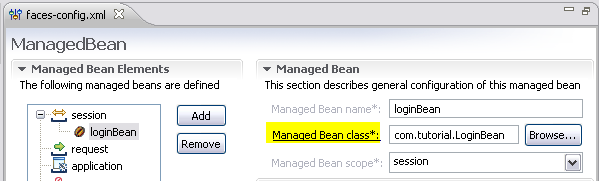
the Faces Configuration editor.To edit the Java class, click on the
hyperlink,
ManagedBean class
in the Managed bean page as shown in the figure below. This will launch
the Java editor.
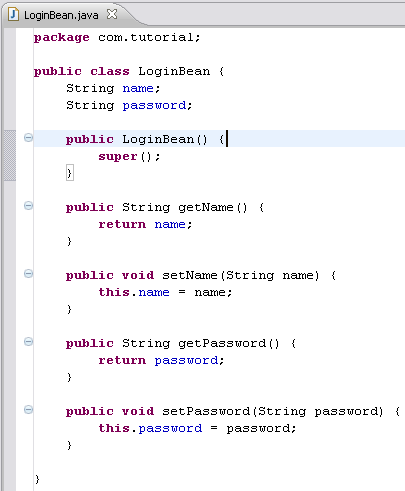
Edit the Java class,
com.tutorial.LoginBean
. Add the following code and save.
In the Project Explorer view, right-mouse click on the JSP page,
login.jsp
and from the context menu, select the
Validate
option. Note that the page should now be valid.
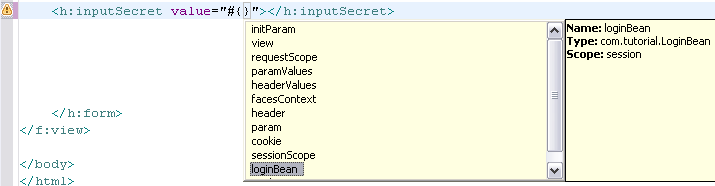
In the Source Page of the Web Page Editor, add the JSF tag,
<h:inputSecret value="#{}"></h:inputSecret>
. With the cursor inside the brackets, hit
Ctrl+spacebar
. You should see a pop-up with a list of all the implicit objects plus
the managed bean defined above. Select the managed bean,
loginBean
Enter the name of a property, say x, that is not defined in the managed
bean and save the change. The editor will report a warning that the
property cannot be resolved.

Delete the invalid property. Hit
Ctrl+spacebar
after the
'.'
in the bean name. You should see a pop-up listing the properties defined
in the managed bean. Select
password
from the menu.

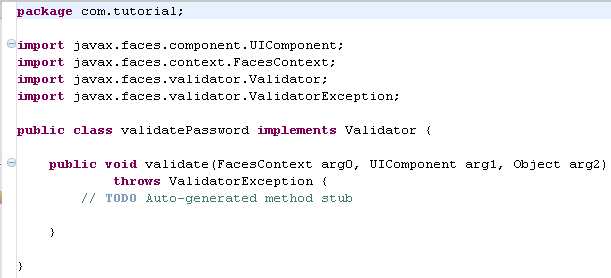
Create a Java class,
com.tutorial.validatePassword
that implements the
Validator
interface and save.
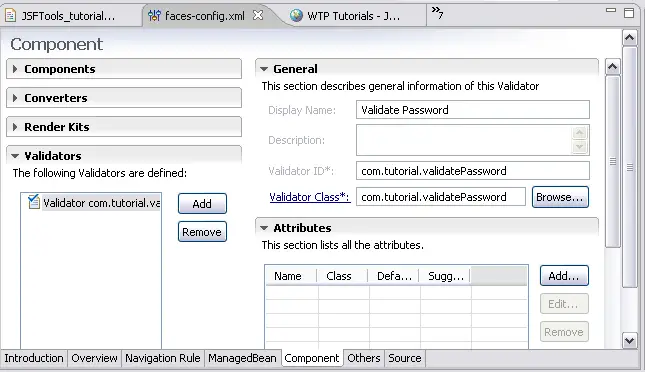
In the Project Explorer, expand the node, JSFTutorial->WebContent.
Double-click on
faces-config.xml
. This will launch the faces-config editor. Select the
Component
tab. Expand the
Validators
section.

Click on the
Add
button. Select the
Browse
button associated with the
Validator Class
field and select the
com.tutorial.ValidatePassword
class. Save the changes.
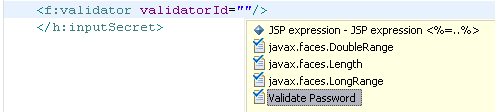
Add the JSF tag,
<f:validator id=""></f:validator >
. With the cursor inside the double-quote, hit
Ctrl+spacebar
. You should see a pop-up with a list of all the standard validators
plus those registered in the faces-config file. Select
Validate Password
.
We will now move the static strings we have used in the page to a
resource bundle. To do this, add a file called,
messages.properties
in the folder
com.tutorial
. Define the properties as shown below and save the file.

Add the JSF tag,
loadBundle
as shown below. You can drag-and-drop the tag from the
JSF Core
section of the Palette View.

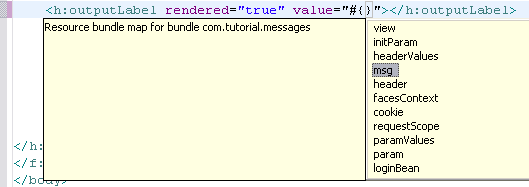
Delete the string,
Name
in the value attribute of the
outputLabel
tag. Position the curson inside the brackets and hit
Ctrl+spacebar
. You should see a pop-up with a list that includes the
msg
variable that you defined in the
loadBundle
tag. Select it.
Enter a dot after
msg
and and hit
Ctrl+spacebar
. You should see a pop-up with a list of properties defined in the
messages.properties
file. Select the property,
name
.

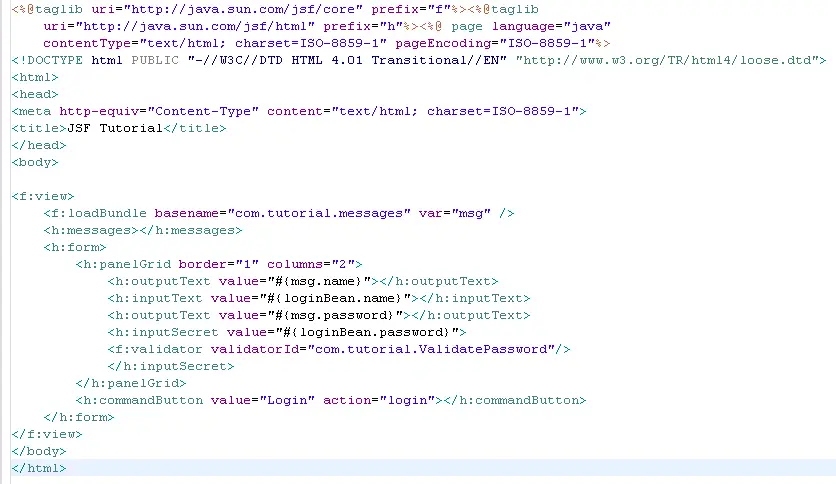
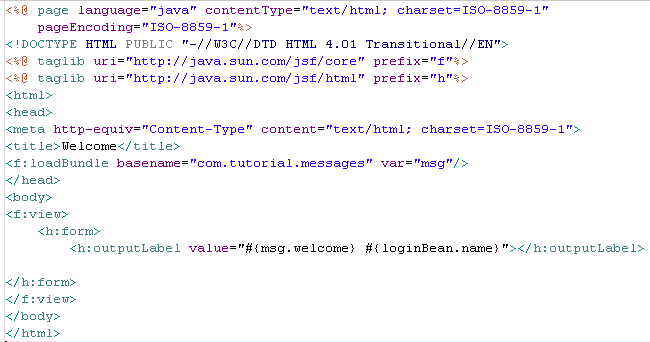
Complete the login page as shown below.
Create a new JSF page,
welcome.jsp
as shown below.
Faces Configuration Resource
Editor
The JSF Tools project includes a special editor for the faces
configuration resource files. The following section gives a brief
introduction to the editor. A comprehensive tutorial detailing all the
features of the editor will be published soon.
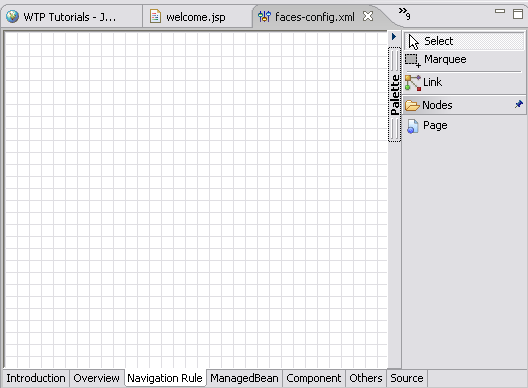
Double-click on the
faces-config.xml
file to launch the Faces configuration editor. Switch to the
Navigation
tab.
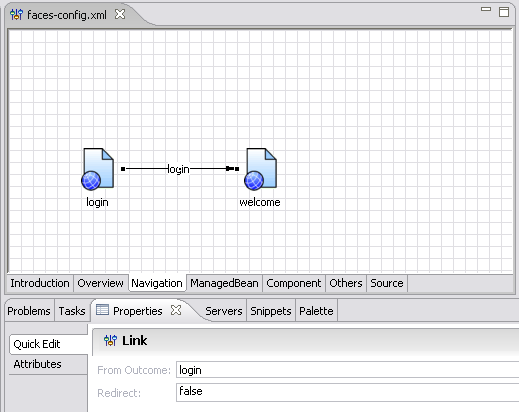
- Add the login.jsp and welcome.jsp to the
Navigation tab. Select the Page control from the Palette and
drop it on the Navigation tab. Choose the page in the resulting Select
JSP File dialog.
- Connect the two pages. Click on the Link control in the
Palette, select the login page and draw a line to the welcome
page. Select the line in the Navigation tab and in the property view,
set the value of the from-outcome to login .
Testing the JSF JSP Page
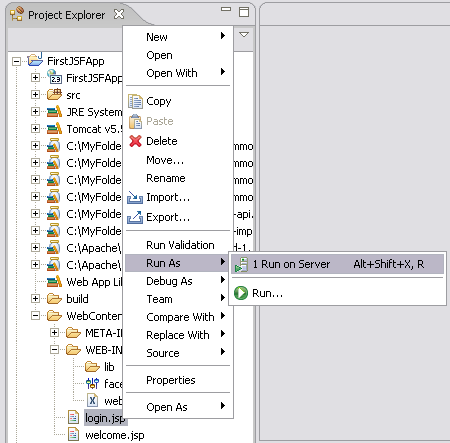
1) We will now execute the page against the Apache Tomcat server.
Choose Run on Server using the context menu while selecting the
login.jsp page in the navigator.
2) Choose your Apache Tomcat server and set it up as required if
you had not already done so.
3) Click Finish. You should see from the Console view that the Tomcat
server starts and then you should see the executing login page appear in
the Web Browser like below.

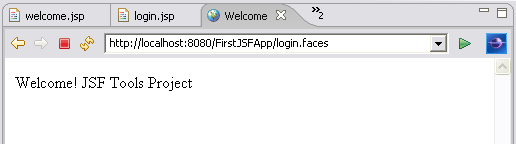
Click on the
login
button. You should navigate to the
welcome
page.
Congratulations! You have created and executed your first
JavaServer Faces application using the new Eclipse WTP JSF Tools.


