Adding preprocessing support to a MIDlet project
Device fragmentation is a difficult issue in the Micro Edition
world. Devices are constrained in a variety of different and
inconsistent ways. While there are many techniques that can be used to
deal with these inconsistencies, the limited memory and processing power
of many mobile devices points to a solution that occurs off-device
rather than something that happens at runtime.
MTJ provides some help in the area of device fragmentation
through the inclusion of a source code "preprocessor". Using the limited
processing power of the preprocessor, it is possible to do some build
time source code transformations.
Enabling and Disabling Preprocessing
Use of the preprocessing functionality is an optional part of the
MTJ functionality. Preprocessing is enabled or disabled on a
project-level basis, allowing significant flexibility in the structure
of workspace projects.
Enabling Preprocessing
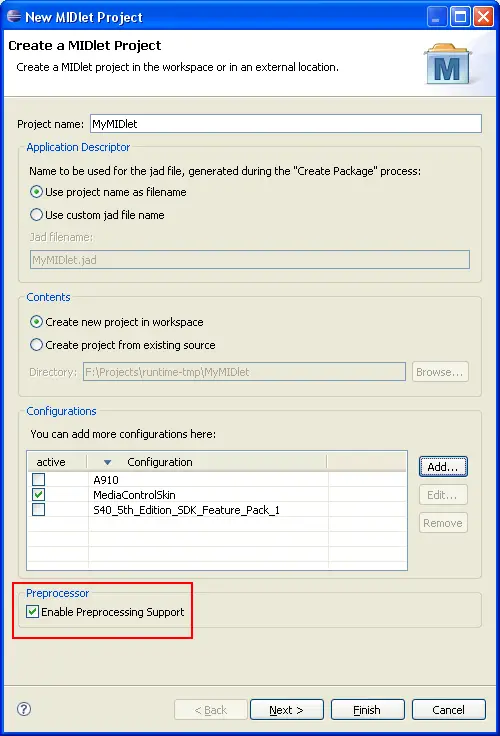
Enabling preprocessing functionality can be accomplished in two
different ways. During the creation of a new MIDlet Suite, preprocessing
may be enabled on the first page of the wizard.
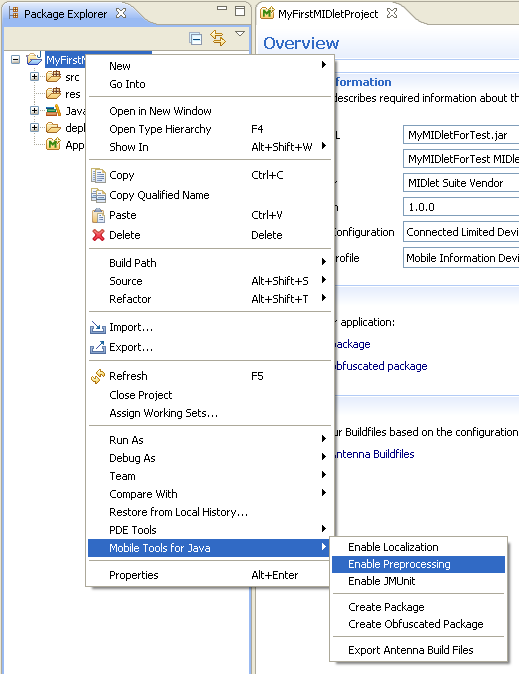
After a project has been created preprocessing may be enabled via
the Java ME project context menu option.
Disabling Preprocessing
Projects with preprocessing functionality enabled, may also
disable the functionality if it is no longer necessary or useful.
Disabling the preprocessor is done via the project context menu, just as
enablement is done. For projects with processing enabled, there will be
a "Disable Preprocessing" menu item rather than an item to enable
processing.
Controlling Compilation
Preprocessing controls the final compiled code using a set of
preprocessor directives. The preprocessor supports the following
directives inside a Java source file. All directives must follow a "//"
comment that starts at the beginning of a line (whitespace is allowed
left of them, but no Java code). That way, they don't interfere with
normal Java compilation. Directives must not span multiple lines of
code.
| Directive |
Description |
| #define <identifier> |
Defines an identifier, thus making its value "true" when it
is referenced in further expressions. |
| #undefine <identifier> |
Undefines an identifier, thus making its value "false" when
it is referenced in further expressions. |
| #ifdef <identifier> |
The following lines are compiled only if the
given identifier is defined (or undefined, in the case of an "#ifndef"
directive). "#else" does exactly what your think it does. Each
directive must be ultimately closed by an "#endif" directive. The
"#elifdef" and "#elifndef" directives help to specify longer
conditional cascades without having to nest each level.
The "#if" and "#elif" directives even allow to use complex
expressions. These expressions are very much like Java boolean
expressions. They may consist of identifiers, parentheses and the
usual "&&", "||", "^", and "!" operators.
Please note that "#ifdef" and "#ifndef" don't support complex
expressions. They only expect a single argument - the symbol to be
checked.
|
| #ifndef <identifier> |
| #else |
| #endif |
| #elifdef <identifier> |
| #elifndef <identifier> |
| #if <expression> |
| #elif <expression> |
| #include <filename> |
Includes the given source file at the current
position. Must be terminated by "#endinclude" for technical reasons.
Note that relative file names are interpreted as relative to the
project root directory. |
| #endinclude |
Defining Symbols
The compilation directive expressions are dependent on the
definition of a set of "symbols". These symbols are either defined/true
or undefined/false. It is possible to control whether a particular
symbol is defined or undefined directly via preprocessing directives or
indirectly through the definition of symbol definition sets.
Direct Definitions
The #define and #undefine directives
directly control whether a particular symbol is currently defined or
undefined. Using these directives, it is possible to override the
current state of a symbol from a previous setting.
Symbol Definition Sets
Symbol definition sets provide a means to define a group of
related symbols with a particular name to reference that group. A
definition set may then be specified for a project via the user
interface to control the compilation.
Symbol definition sets are most useful for controlling
definitions without the need to alter source code. For example, symbol
definition sets can be used to remove debugging information to create a
production build. Start by defining a "Debug" symbol definition set in
which the symbol "DEBUG" has been defined. Wrap the debugging code in
your project with "#ifdef DEBUG" directives. When building a production
version of the code, use a different symbol definition set that does not
have DEBUG defined and the debugging code will be removed.
...
// #ifdef DEBUG
System.out.println("Some debug output");
// #endif
...
Defining Configuration Scope Symbol Definition Sets
When you add configuration to project, it will generate a set of
symbols according the device you choose. You can also modify the
generated symbols. For details, please refer ConfigurationDocument
Defining Workspace Scope Symbol Definition Sets
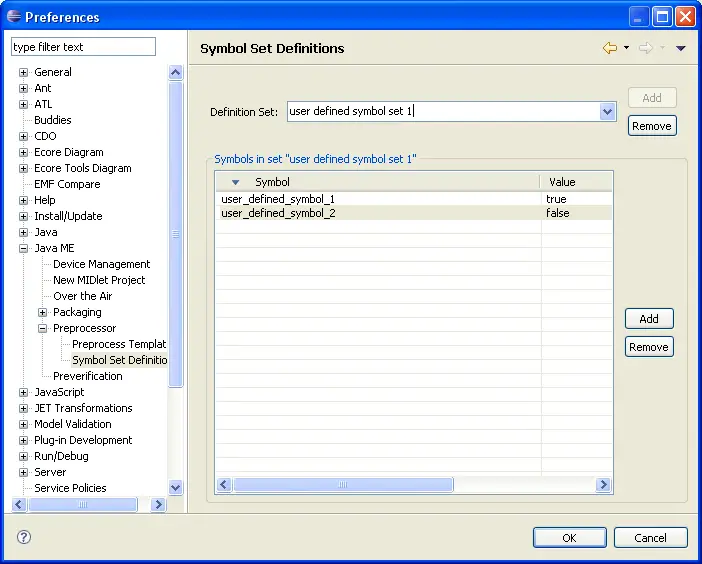
Workspace Scope Symbol Definition Sets can be shared by all
projects in the workspace. Symbol set definitions are accessed via the
MTJ preferences. From the Window menu, choose the Preferences...
menu item. Expand the Mobiles Tools for Java category and select the Symbol
Set Definitions category.
Creating a New Set
Creating a new symbol definition set is accomplished by
specifying the name of the definition set and selecting the Add
button. An empty set will be created.
Defining Symbols
To define a new symbol:
- Select the set via the definition set drop-down.
- Press the Add button to the right of the symbols list.
- Select the newly created default symbol name and edit the name
within the cell.
Removing Symbols
To remove a symbol from the set:
- Select the set via the definition set drop-down.
- Select symbol definition to be removed.
- Press the Remove button to the right of the symbols
list.
Removing a Set
If a symbol definition set is no longer necessary, it can be
removed:
- Select the set via the definition set drop-down.
- Press the Remove button to the right of the definition
set drop-down.
Referencing Symbol Definition Sets
Once a Symbol Definition Set has been defined, it may be
referenced by a project. This is accomplished from the Add/EditConfiguration Dialog.
Both configuration scope symbol set and Workspace scope symbol
sets you choose will then be used by the preprocessor directives in
processing the source code.


