Writing and running JUnit tests
In this section, you will be using the
JUnit
testing framework to write and run tests. To get started with JUnit you can
refer to the
JUnit
Cookbook.
Writing Tests
Create a project "JUnitTest". Now you can write your
first test. You implement the test in a subclass of TestCase. You can
do so either using the standard Class wizard or the specialized Test Case
wizard:
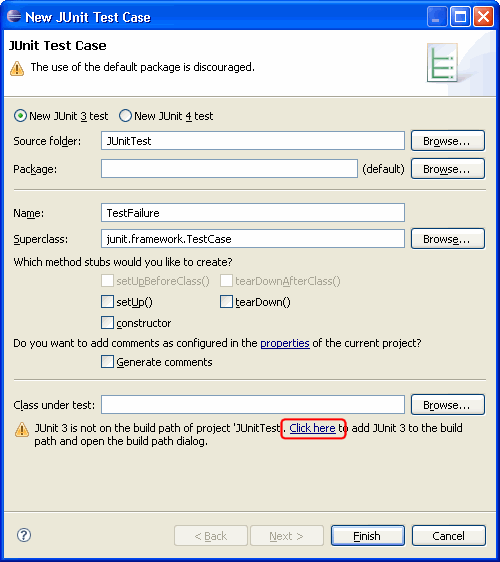
- Open the New wizard (File > New > JUnit Test Case).
- Select New JUnit 3 test and enter
"TestFailure" as the name of your test class:
Note: If you want to use JUnit 4 tests you have to make
sure that your compiler compliance is set to 1.5.
- You will see a warning message asking you to add the junit library
to the build path. Use the Click here link to
add the junit library automatically.
- Click Finish to create the test class.
Add a test method that fails to the class TestFailure. A quick
way to enter a test method is with the test template. To do so, place the cursor inside the class declaration.
Type "test" followed by Ctrl+Space to activate code
assist and select the "test" template. Change the name of the
created method to testFailure and invoke the fail() method.
public void testFailure() throws Exception {

    fail();

}
Now you are ready to run your first test.
Running Tests
To run TestFailure hit the run button in the toolbar. It will automatically run as JUnit Test.
You can inspect the test results in the JUnit view. This view shows
you the test run progress and status:

The view is shown in the current
perspective whenever you start a test run. A convenient arrangement for the
JUnit view is to dock it as a fast view. The JUnit view has two tabs: one shows
you a list of failures and the other shows you the full test suite as
a tree. You can navigate from a failure to the corresponding source by
double clicking the corresponding line in the failure trace.
Dock the JUnit view as a fast view, remove the
fail() statement in the method testFailure() so that the test passes and rerun
the test again. You can rerun a test either by clicking the Rerun button in
the view's tool bar or you can re-run the program that was last launched by activating
the Run drop down. This time the test should succeed. Because the test was successful,
the JUnit view doesn't pop up, but the success indicator shows on
the JUnit view icon and the status line shows the test result. As a reminder
to rerun your tests the view icon is decorated by a "*"
whenever you change the workspace contents after the run.
 - A successful test run
 -
A successful test run, but the workspace contents have changed since the
last test run.
-
A successful test run, but the workspace contents have changed since the
last test run.
In addition to running a test case as described above you can also:
- Run all tests inside a project, source folder, or package -
Select a project, package or source folder and run all the included tests with Run as > JUnit Test.
This command finds all tests inside a project, source folder or package
and executes them.
- Run a single test method -
Select a test method in the Outline or Package Explorer and with Run as > JUnit Test
the selected test method will be run.
- Rerun a single test -
Select a test in the JUnit view and execute Run from the context
menu.
Customizing a Test Configuration
When you want to pass parameters or customize the
settings for a test run you open the Launch Configuration Dialog. Select Open Run Dialog....in the Run
drop-down menu in the toolbar:
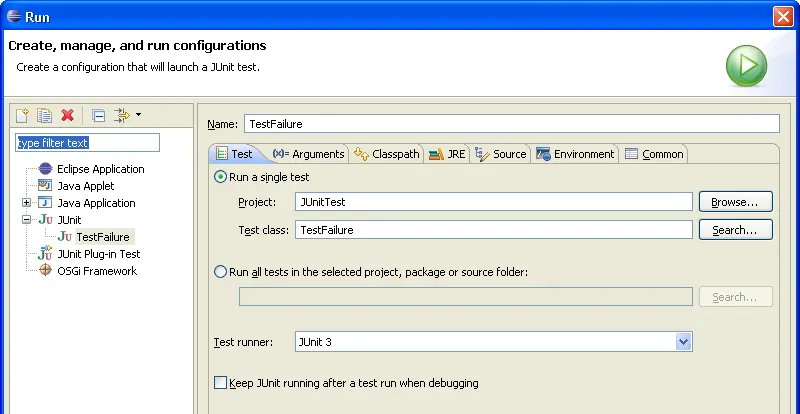
In this dialog you can specify the test to be run, its arguments, its run-time
class path, and the Java run-time environment.
Debugging a Test Failure
In the case of a test failure you can follow these steps to debug it:
- Double click the failure entry from the Failures tab in the JUnit view to open the
corresponding file in the editor.
- Set a breakpoint at the beginning of the test method.
- Select the test case and execute Debug As>JUnit Test from
the Debug drop down.
A JUnit launch configuration has a "keep alive" option. If your
Java virtual machine supports "hot code replacement" you can fix the code and rerun the test
without restarting the full test run. To enable this option select the Keep
JUnit running after a test run when debugging checkbox in the JUnit
launch configuration.
Creating a Test Suite
The JUnit TestSuite wizard helps you with the creation of a test
suite. You can select the set of classes that should belong to a suite.
- Open the New wizard
- Select Java > JUnit > JUnit Test Suite and click Next.
- Enter a name for your test suite class (the convention is to use
"AllTests" which appears by default).
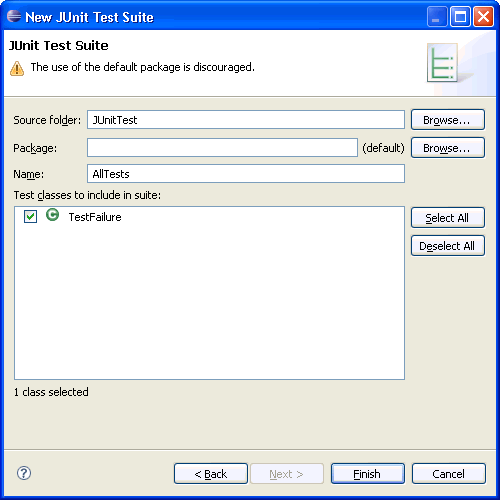
- Select the classes that should be included in the suite. We currently
have a single test class only, but you can add to the suite later.
You can add or remove test classes from the test suite in two ways:
- Manually by editing the test suite file
- By re-running the wizard and selecting the new set of test classes.
Note: the wizard puts 2 markers, //$JUnit-BEGIN$ and
//$JUnit-END$, into the created Test suite class, which allows
the wizard to update existing test suite classes. Editing code between the markers is
not recommended.


