Chapter 16. Package Management Tool
During installation, a default set of software packages are
installed. Because people use their computers differently, users
might want to install or remove packages after installation. The
Package Management Tool allows users to
perform these actions.
The X Window System is required to run the Package Management Tool. To start the
application, go to (the main
menu on the panel) =>
=> , or type the
command system-config-packages at shell
prompt.
The same interface automatically appears when you insert the Red
Hat Enterprise Linux CD #1 into your computer.
The interface for this application is similar to the one used
for individual package selection during installation. Packages are
divided into package groups, which contain a list of standard packages and extra
packages that share common functionality. For example, the
Graphical Internet group contains a Web
browser, email client, and other graphical programs used to
connected to the Internet. The standard packages can not be
selected for removal unless the entire package group is removed.
The extra packages are optional packages that can be selected for
installation or removal, as long as the package group is
selected.
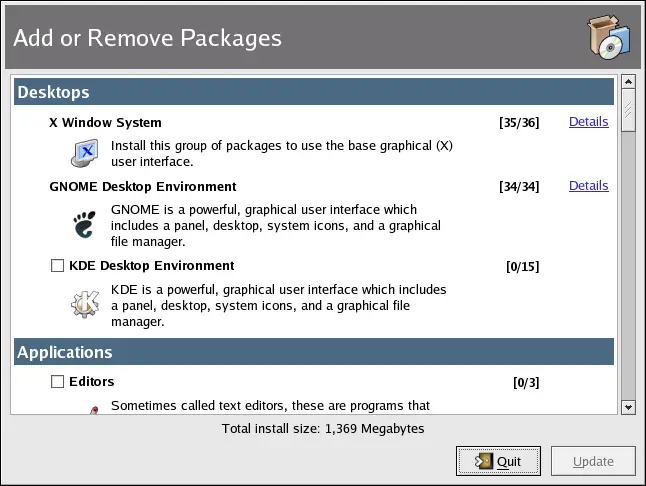
The main window shows a list of package groups. If the package
group has a checkmark in the checkbox beside it, packages from that
group are currently installed. To view the individual packages list
for a group, click the Details link beside
it. Individual packages with a checkmark beside them are currently
installed.
To install standard packages from a package group that is not
currently installed, check the checkbox beside that package group.
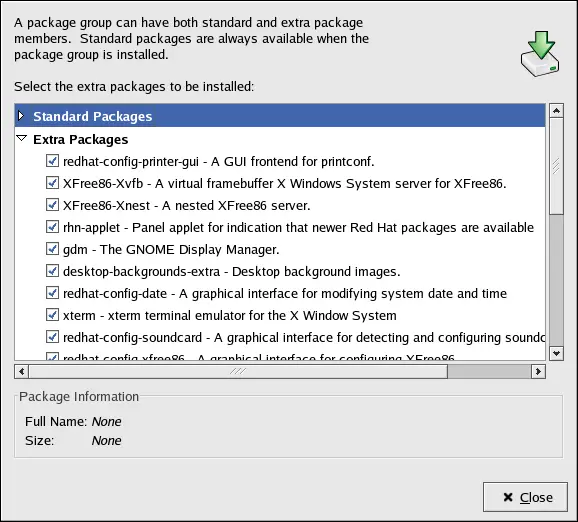
To customize the packages to be installed within a group, click the
Details link beside it. The list of
standard and extra packages is displayed, as shown in Figure 16-2.
Clicking on the package name displays the disk space required to
install the package at the bottom of the window. Checking the
checkbox beside the package name marks it for installation.
You can also select individual packages from already installed
package groups by clicking the Details link
and checking any of the extra packages not already installed.
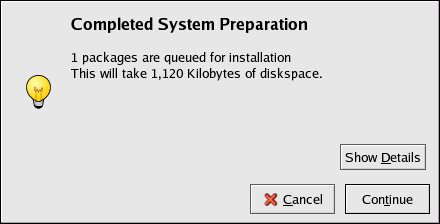
After selecting package groups and individual packages to
install, click the Update button on the
main window. Information such as the number of packages to be
installed and the amount of disk space required to install the
packages, as well as any package dependencies, is displayed in a
summary window. If there are package dependencies, they are
automatically added to the list of packages to install. Click the
Show Details button to view the complete
list of packages to be installed.
Click Continue to start the
installation process. When it is finished, an Update Complete message appears.
 |
Tip |
| |
If you use Nautilus to manage the
files and directories on your computer, you can also use it to
install packages. In Nautilus, go to the
directory that contains an RPM package (they usually end in
.rpm), and double-click on the RPM
icon.
|