NOTE: CentOS Enterprise Linux 5 is built from the Red Hat Enterprise Linux source code. Other than logo and name changes CentOS Enterprise Linux 5 is compatible with the equivalent Red Hat version. This document applies equally to both Red Hat and CentOS Enterprise Linux 5.
Organizations with several satellite offices often connect to each other with dedicated lines for efficiency and protection of sensitive data in transit. For example, many businesses use frame relay or Asynchronous Transfer Mode (ATM) lines as an end-to-end networking solution to link one office with others. This can be an expensive proposition, especially for small to medium sized businesses (SMBs) that want to expand without paying the high costs associated with enterprise-level, dedicated digital circuits.
To address this need, Virtual Private Networks (VPNs) were developed. Following the same functional principles as dedicated circuits, VPNs allow for secured digital communication between two parties (or networks), creating a Wide Area Network (WAN) from existing Local Area Networks (LANs). Where it differs from frame relay or ATM is in its transport medium. VPNs transmit over IP using datagrams as the transport layer, making it a secure conduit through the Internet to an intended destination. Most free software VPN implementations incorporate open standard encryption methods to further mask data in transit.
Some organizations employ hardware VPN solutions to augment security, while others use software or protocol-based implementations. Several vendors provide hardware VPN solutions, such as Cisco, Nortel, IBM, and Checkpoint. There is a free software-based VPN solution for Linux called FreeS/Wan that utilizes a standardized Internet Protocol Security (IPsec) implementation. These VPN solutions, irrespective of whether they are hardware or software based, act as specialized routers that exist between the IP connection from one office to another.
42.7.1. How Does a VPN Work?
When a packet is transmitted from a client, it sends it through the VPN router or gateway, which adds an Authentication Header (AH) for routing and authentication. The data is then encrypted and, finally, enclosed with an Encapsulating Security Payload (ESP). This latter constitutes the decryption and handling instructions.
The receiving VPN router strips the header information, decrypts the data, and routes it to its intended destination (either a workstation or other node on a network). Using a network-to-network connection, the receiving node on the local network receives the packets already decrypted and ready for processing. The encryption/decryption process in a network-to-network VPN connection is transparent to a local node.
With such a heightened level of security, an attacker must not only intercept a packet, but decrypt the packet as well. Intruders who employ a man-in-the-middle attack between a server and client must also have access to at least one of the private keys for authenticating sessions. Because they employ several layers of authentication and encryption, VPNs are a secure and effective means of connecting multiple remote nodes to act as a unified intranet.
42.7.2. VPNs and Red Hat Enterprise Linux
Red Hat Enterprise Linux provides various options in terms of implementing a software solution to securely connect to a WAN. Internet Protocol Security (IPsec) is the supported VPN implementation for Red Hat Enterprise Linux, and sufficiently addresses the usability needs of organizations with branch offices or remote users.
42.7.3. IPsec
Red Hat Enterprise Linux supports IPsec for connecting remote hosts and networks to each other using a secure tunnel on a common carrier network such as the Internet. IPsec can be implemented using a host-to-host (one computer workstation to another) or network-to-network (one LAN/WAN to another) configuration.
The IPsec implementation in Red Hat Enterprise Linux uses Internet Key Exchange (IKE), a protocol implemented by the Internet Engineering Task Force (IETF), used for mutual authentication and secure associations between connecting systems.
42.7.4. Creating an IPsec Connection
An IPsec connection is split into two logical phases. In phase 1, an IPsec node initializes the connection with the remote node or network. The remote node or network checks the requesting node's credentials and both parties negotiate the authentication method for the connection.
On Red Hat Enterprise Linux systems, an IPsec connection uses the pre-shared key method of IPsec node authentication. In a pre-shared key IPsec connection, both hosts must use the same key in order to move to Phase 2 of the IPsec connection.
Phase 2 of the IPsec connection is where the Security Association (SA) is created between IPsec nodes. This phase establishes an SA database with configuration information, such as the encryption method, secret session key exchange parameters, and more. This phase manages the actual IPsec connection between remote nodes and networks.
The Red Hat Enterprise Linux implementation of IPsec uses IKE for sharing keys between hosts across the Internet. The racoon keying daemon handles the IKE key distribution and exchange. Refer to the racoon man page for more information about this daemon.
42.7.5. IPsec Installation
Implementing IPsec requires that the ipsec-tools RPM package be installed on all IPsec hosts (if using a host-to-host configuration) or routers (if using a network-to-network configuration). The RPM package contains essential libraries, daemons, and configuration files for setting up the IPsec connection, including:
/sbin/setkey — manipulates the key management and security attributes of IPsec in the kernel. This executable is controlled by the racoon key management daemon. Refer to the setkey(8) man page for more information.
/sbin/racoon — the IKE key management daemon, used to manage and control security associations and key sharing between IPsec-connected systems.
/etc/racoon/racoon.conf — the racoon daemon configuration file used to configure various aspects of the IPsec connection, including authentication methods and encryption algorithms used in the connection. Refer to the racoon.conf(5) man page for a complete listing of available directives.
To configure IPsec on Red Hat Enterprise Linux, you can use the Network Administration Tool, or manually edit the networking and IPsec configuration files.
IPsec can be configured to connect one desktop or workstation (host) to another using a host-to-host connection. This type of connection uses the network to which each host is connected to create a secure tunnel between each host. The requirements of a host-to-host connection are minimal, as is the configuration of IPsec on each host. The hosts need only a dedicated connection to a carrier network (such as the Internet) and Red Hat Enterprise Linux to create the IPsec connection.
42.7.6.1. Host-to-Host Connection
A host-to-host IPsec connection is an encrypted connection between two systems, both running IPsec with the same authentication key. With the IPsec connection active, any network traffic between the two hosts is encrypted.
To configure a host-to-host IPsec connection, use the following steps for each host:
Note
You should perform the following procedures on the actual machine that you are configuring. Avoid attempting to configure and establish IPsec connections remotely.
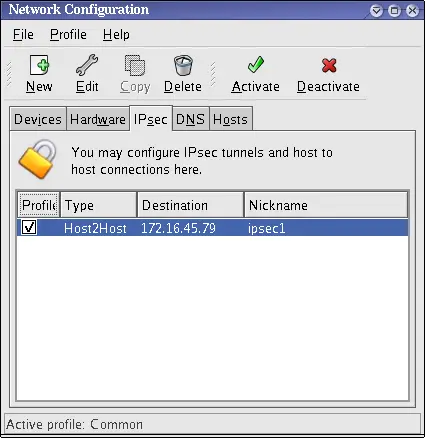
In a command shell, type system-config-network to start the Network Administration Tool.
On the IPsec tab, click New to start the IPsec configuration wizard.
Click Forward to start configuring a host-to-host IPsec connection.
Enter a unique name for the connection, for example, ipsec0. If required, select the check box to automatically activate the connection when the computer starts. Click Forward to continue.
Select Host to Host encryption as the connection type, and then click Forward.
Select the type of encryption to use: manual or automatic.
If you select manual encryption, an encryption key must be provided later in the process. If you select automatic encryption, the racoon daemon manages the encryption key. The ipsec-tools package must be installed if you want to use automatic encryption.
Click Forward to continue.
Enter the IP address of the remote host.
To determine the IP address of the remote host, use the following command on the remote host:
[root@myServer ~] # /sbin/ifconfig <device>
where <device> is the Ethernet device that you want to use for the VPN connection. If only one Ethernet card exists in the system, the device name is typically eth0. The following example shows the relevant information from this command (note that this is an example output only):
eth0      Link encap:Ethernet  HWaddr 00:0C:6E:E8:98:1D
          inet addr:172.16.44.192  Bcast:172.16.45.255  Mask:255.255.254.0
The IP address is the number following the inet addr: label.
Click Forward to continue.
If manual encryption was selected in step 6, specify the encryption key to use, or click Generate to create one.
Specify an authentication key or click Generate to generate one. It can be any combination of numbers and letters.
Click Forward to continue.
Verify the information on the IPsec — Summary page, and then click Apply.
Click File => Save to save the configuration.
You may need to restart the network for the changes to take effect. To restart the network, use the following command:
[root@myServer ~]# service network restart
Select the IPsec connection from the list and click the Activate button.
Repeat the entire procedure for the other host. It is essential that the same keys from step 8 be used on the other hosts. Otherwise, IPsec will not work.
The following files are created when the IPsec connection is configured:
/etc/sysconfig/network-scripts/ifcfg-<nickname>
/etc/sysconfig/network-scripts/keys-<nickname>
/etc/racoon/<remote-ip>.conf
/etc/racoon/psk.txt
If automatic encryption is selected, /etc/racoon/racoon.conf is also created.
When the interface is up, /etc/racoon/racoon.conf is modified to include <remote-ip>.conf.
42.7.6.2. Manual IPsec Host-to-Host Configuration
The first step in creating a connection is to gather system and network information from each workstation. For a host-to-host connection, you need the following:
The IP address of each host
A unique name, for example, ipsec1. This is used to identify the IPsec connection and to distinguish it from other devices or connections.
A fixed encryption key or one automatically generated by racoon.
A pre-shared authentication key that is used during the initial stage of the connection and to exchange encryption keys during the session.
For example, suppose Workstation A and Workstation B want to connect to each other through an IPsec tunnel. They want to connect using a pre-shared key with the value of Key_Value01, and the users agree to let racoon automatically generate and share an authentication key between each host. Both host users decide to name their connections ipsec1.
Note
You should choose a PSK that uses a mixture of upper- and lower-case characters, numbers and punctuation. An easily-guessable PSK constitutes a security risk.
It is not necessary to use the same connection name for each host. You should choose a name that is convenient and meaningful for your installation.
The following is the IPsec configuration file for Workstation A for a host-to-host IPsec connection with Workstation B. The unique name to identify the connection in this example is ipsec1, so the resulting file is called /etc/sysconfig/network-scripts/ifcfg-ipsec1.
DST=X.X.X.X
TYPE=IPSEC
ONBOOT=no
IKE_METHOD=PSK
For Workstation A, X.X.X.X is the IP address of Workstation B. For Workstation B, X.X.X.X is the IP address of Workstation A. This connection is not set to initiate on boot-up (ONBOOT=no) and it uses the pre-shared key method of authentication (IKE_METHOD=PSK).
The following is the content of the pre-shared key file (called /etc/sysconfig/network-scripts/keys-ipsec1) that both workstations need to authenticate each other. The contents of this file should be identical on both workstations, and only the root user should be able to read or write this file.
IKE_PSK=Key_Value01
Important
To change the keys-ipsec1 file so that only the root user can read or edit the file, use the following command after creating the file:
To change the authentication key at any time, edit the keys-ipsec1 file on both workstations. Both authentication keys must be identical for proper connectivity.
The next example shows the specific configuration for the phase 1 connection to the remote host. The file is called X.X.X.X.conf, where X.X.X.X is the IP address of the remote IPsec host. Note that this file is automatically generated when the IPsec tunnel is activated and should not be edited directly.
The default phase 1 configuration file that is created when an IPsec connection is initialized contains the following statements used by the Red Hat Enterprise Linux implementation of IPsec:
remote X.X.X.X
Specifies that the subsequent stanzas of this configuration file apply only to the remote node identified by the X.X.X.X IP address.
exchange_mode aggressive
The default configuration for IPsec on Red Hat Enterprise Linux uses an aggressive authentication mode, which lowers the connection overhead while allowing configuration of several IPsec connections with multiple hosts.
my_identifier address
Specifies the identification method to use when authenticating nodes. Red Hat Enterprise Linux uses IP addresses to identify nodes.
encryption_algorithm 3des
Specifies the encryption cipher used during authentication. By default, Triple Data Encryption Standard (3DES) is used.
hash_algorithm sha1;
Specifies the hash algorithm used during phase 1 negotiation between nodes. By default, Secure Hash Algorithm version 1 is used.
authentication_method pre_shared_key
Specifies the authentication method used during node negotiation. By default, Red Hat Enterprise Linux uses pre-shared keys for authentication.
dh_group 2
Specifies the Diffie-Hellman group number for establishing dynamically-generated session keys. By default, modp1024 (group 2) is used.
42.7.6.2.1. The Racoon Configuration File
The /etc/racoon/racoon.conf files should be identical on all IPsec nodes except for the include "/etc/racoon/X.X.X.X.conf" statement. This statement (and the file it references) is generated when the IPsec tunnel is activated. For Workstation A, the X.X.X.X in the include statement is Workstation B's IP address. The opposite is true of Workstation B. The following shows a typical racoon.conf file when the IPsec connection is activated.
# Racoon IKE daemon configuration file.
# See 'man racoon.conf' for a description of the format and entries.

path include "/etc/racoon";
path pre_shared_key "/etc/racoon/psk.txt";
path certificate "/etc/racoon/certs";

sainfo anonymous
{
        pfs_group 2;
        lifetime time 1 hour ;
        encryption_algorithm 3des, blowfish 448, rijndael ;
        authentication_algorithm hmac_sha1, hmac_md5 ;
        compression_algorithm deflate ;
}
include "/etc/racoon/X.X.X.X.conf";
This default racoon.conf file includes defined paths for IPsec configuration, pre-shared key files, and certificates. The fields in sainfo anonymous describe the phase 2 SA between the IPsec nodes — the nature of the IPsec connection (including the supported encryption algorithms used) and the method of exchanging keys. The following list defines the fields of phase 2:
sainfo anonymous
Denotes that SA can anonymously initialize with any peer provided that the IPsec credentials match.
pfs_group 2
Defines the Diffie-Hellman key exchange protocol, which determines the method by which the IPsec nodes establish a mutual temporary session key for the second phase of IPsec connectivity. By default, the Red Hat Enterprise Linux implementation of IPsec uses group 2 (or modp1024) of the Diffie-Hellman cryptographic key exchange groups. Group 2 uses a 1024-bit modular exponentiation that prevents attackers from decrypting previous IPsec transmissions even if a private key is compromised.
lifetime time 1 hour
This parameter specifies the lifetime of an SA and can be quantified either by time or by bytes of data. The default Red Hat Enterprise Linux implementation of IPsec specifies a one hour lifetime.
encryption_algorithm 3des, blowfish 448, rijndael
Specifies the supported encryption ciphers for phase 2. Red Hat Enterprise Linux supports 3DES, 448-bit Blowfish, and Rijndael (the cipher used in the Advanced Encryption Standard, or AES).
authentication_algorithm hmac_sha1, hmac_md5
Lists the supported hash algorithms for authentication. Supported modes are sha1 and md5 hashed message authentication codes (HMAC).
compression_algorithm deflate
Defines the Deflate compression algorithm for IP Payload Compression (IPCOMP) support, which allows for potentially faster transmission of IP datagrams over slow connections.
To start the connection, use the following command on each host:
[root@myServer ~]# /sbin/ifup <nickname>
where <nickname> is the name you specified for the IPsec connection.
To test the IPsec connection, run the tcpdump utility to view the network packets being transfered between the hosts and verify that they are encrypted via IPsec. The packet should include an AH header and should be shown as ESP packets. ESP means it is encrypted. For example:
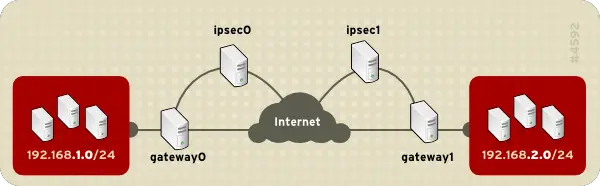
IPsec can also be configured to connect an entire network (such as a LAN or WAN) to a remote network using a network-to-network connection. A network-to-network connection requires the setup of IPsec routers on each side of the connecting networks to transparently process and route information from one node on a LAN to a node on a remote LAN. Figure 42.11, “A network-to-network IPsec tunneled connection” shows a network-to-network IPsec tunneled connection.
Figure 42.11. A network-to-network IPsec tunneled connection
This diagram shows two separate LANs separated by the Internet. These LANs use IPsec routers to authenticate and initiate a connection using a secure tunnel through the Internet. Packets that are intercepted in transit would require brute-force decryption in order to crack the cipher protecting the packets between these LANs. The process of communicating from one node in the 192.168.1.0/24 IP range to another in the 192.168.2.0/24 range is completely transparent to the nodes as the processing, encryption/decryption, and routing of the IPsec packets are completely handled by the IPsec router.
The information needed for a network-to-network connection include:
The externally-accessible IP addresses of the dedicated IPsec routers
The network address ranges of the LAN/WAN served by the IPsec routers (such as 192.168.1.0/24 or 10.0.1.0/24)
The IP addresses of the gateway devices that route the data from the network nodes to the Internet
A unique name, for example, ipsec1. This is used to identify the IPsec connection and to distinguish it from other devices or connections.
A fixed encryption key or one automatically generated by racoon
A pre-shared authentication key that is used during the initial stage of the connection and to exchange encryption keys during the session.
42.7.7.1. Network-to-Network (VPN) Connection
A network-to-network IPsec connection uses two IPsec routers, one for each network, through which the network traffic for the private subnets is routed.
For example, as shown in Figure 42.12, “Network-to-Network IPsec”, if the 192.168.1.0/24 private network sends network traffic to the 192.168.2.0/24 private network, the packets go through gateway0, to ipsec0, through the Internet, to ipsec1, to gateway1, and to the 192.168.2.0/24 subnet.
IPsec routers require publicly addressable IP addresses and a second Ethernet device connected to their respective private networks. Traffic only travels through an IPsec router if it is intended for another IPsec router with which it has an encrypted connection.
Alternate network configuration options include a firewall between each IP router and the Internet, and an intranet firewall between each IPsec router and subnet gateway. The IPsec router and the gateway for the subnet can be one system with two Ethernet devices: one with a public IP address that acts as the IPsec router; and one with a private IP address that acts as the gateway for the private subnet. Each IPsec router can use the gateway for its private network or a public gateway to send the packets to the other IPsec router.
Use the following procedure to configure a network-to-network IPsec connection:
In a command shell, type system-config-network to start the Network Administration Tool.
On the IPsec tab, click New to start the IPsec configuration wizard.
Click Forward to start configuring a network-to-network IPsec connection.
Enter a unique nickname for the connection, for example, ipsec0. If required, select the check box to automatically activate the connection when the computer starts. Click Forward to continue.
Select Network to Network encryption (VPN) as the connection type, and then click Forward.
Select the type of encryption to use: manual or automatic.
If you select manual encryption, an encryption key must be provided later in the process. If you select automatic encryption, the racoon daemon manages the encryption key. The ipsec-tools package must be installed if you want to use automatic encryption.
Click Forward to continue.
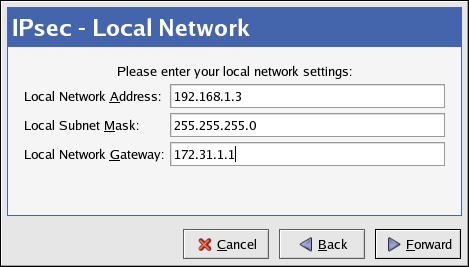
On the Local Network page, enter the following information:
Local Network Address — The IP address of the device on the IPsec router connected to the private network.
Local Subnet Mask — The subnet mask of the local network IP address.
Local Network Gateway — The gateway for the private subnet.
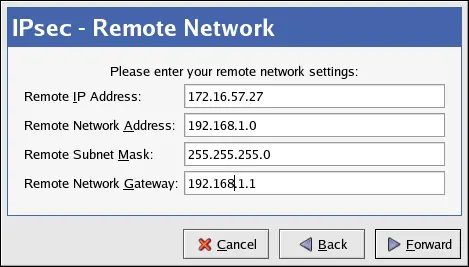
On the Remote Network page, enter the following information:
Remote IP Address — The publicly addressable IP address of the IPsec router for the other private network. In our example, for ipsec0, enter the publicly addressable IP address of ipsec1, and vice versa.
Remote Network Address — The network address of the private subnet behind the otherIPsec router. In our example, enter 192.168.1.0 if configuring ipsec1, and enter 192.168.2.0 if configuring ipsec0.
Remote Subnet Mask — The subnet mask of the remote IP address.
Remote Network Gateway — The IP address of the gateway for the remote network address.
If manual encryption was selected in step 6, specify the encryption key to use or click Generate to create one.
Specify an authentication key or click Generate to generate one. This key can be any combination of numbers and letters.
Suppose LAN A (lana.example.com) and LAN B (lanb.example.com) want to connect to each other through an IPsec tunnel. The network address for LAN A is in the 192.168.1.0/24 range, while LAN B uses the 192.168.2.0/24 range. The gateway IP address is 192.168.1.254 for LAN A and 192.168.2.254 for LAN B. The IPsec routers are separate from each LAN gateway and use two network devices: eth0 is assigned to an externally-accessible static IP address which accesses the Internet, while eth1 acts as a routing point to process and transmit LAN packets from one network node to the remote network nodes.
The IPsec connection between each network uses a pre-shared key with the value of r3dh4tl1nux, and the administrators of A and B agree to let racoon automatically generate and share an authentication key between each IPsec router. The administrator of LAN A decides to name the IPsec connection ipsec0, while the administrator of LAN B names the IPsec connection
ipsec1.
The following example shows the contents of the ifcfg file for a network-to-network IPsec connection for LAN A. The unique name to identify the connection in this example is ipsec0, so the resulting file is called /etc/sysconfig/network-scripts/ifcfg-ipsec0.
The following list describes the contents of this file:
TYPE=IPSEC
Specifies the type of connection.
ONBOOT=yes
Specifies that the connection should initiate on boot-up.
IKE_METHOD=PSK
Specifies that the connection uses the pre-shared key method of authentication.
SRCGW=192.168.1.254
The IP address of the source gateway. For LAN A, this is the LAN A gateway, and for LAN B, the LAN B gateway.
DSTGW=192.168.2.254
The IP address of the destination gateway. For LAN A, this is the LAN B gateway, and for LAN B, the LAN A gateway.
SRCNET=192.168.1.0/24
Specifies the source network for the IPsec connection, which in this example is the network range for LAN A.
DSTNET=192.168.2.0/24
Specifies the destination network for the IPsec connection, which in this example is the network range for LAN B.
DST=X.X.X.X
The externally-accessible IP address of LAN B.
The following example is the content of the pre-shared key file called /etc/sysconfig/network-scripts/keys-ipsecX (where X is 0 for LAN A and 1 for LAN B) that both networks use to authenticate each other. The contents of this file should be identical and only the root user should be able to read or write this file.
IKE_PSK=r3dh4tl1nux
Important
To change the keys-ipsecX file so that only the root user can read or edit the file, use the following command after creating the file:
To change the authentication key at any time, edit the keys-ipsecX file on both IPsec routers. Both keys must be identical for proper connectivity.
The following example is the contents of the /etc/racoon/racoon.conf configuration file for the IPsec connection. Note that the include line at the bottom of the file is automatically generated and only appears if the IPsec tunnel is running.
# Racoon IKE daemon configuration file.
# See 'man racoon.conf' for a description of the format and entries.
path include "/etc/racoon";
path pre_shared_key "/etc/racoon/psk.txt";
path certificate "/etc/racoon/certs";

sainfo anonymous
{
	pfs_group 2;
	lifetime time 1 hour ;
	encryption_algorithm 3des, blowfish 448, rijndael ;
	authentication_algorithm hmac_sha1, hmac_md5 ;
	compression_algorithm deflate ;
}
include "/etc/racoon/X.X.X.X.conf"
The following is the specific configuration for the connection to the remote network. The file is called X.X.X.X.conf (where X.X.X.X is the IP address of the remote IPsec router). Note that this file is automatically generated when the IPsec tunnel is activated and should not be edited directly.
Prior to starting the IPsec connection, IP forwarding should be enabled in the kernel. To enable IP forwarding:
Edit /etc/sysctl.conf and set net.ipv4.ip_forward to 1.
Use the following command to enable the change:
[root@myServer ~] # sysctl -p /etc/sysctl.conf
To start the IPsec connection, use the following command on each router:
[root@myServer ~] # /sbin/ifup ipsec0
The connections are activated, and both LAN A and LAN B are able to communicate with each other. The routes are created automatically via the initialization script called by running ifup on the IPsec connection. To show a list of routes for the network, use the following command:
[root@myServer ~] # /sbin/ip route list
To test the IPsec connection, run the tcpdump utility on the externally-routable device (eth0 in this example) to view the network packets being transfered between the hosts (or networks), and verify that they are encrypted via IPsec. For example, to check the IPsec connectivity of LAN A, use the following command:
The packet should include an AH header and should be shown as ESP packets. ESP means it is encrypted. For example (back slashes denote a continuation of one line):