A toast notificaiton is a message that pops up on the surface of the window.
It only fills the amount of space required for the message and the user's current
activity remains visible and interactive. The notification automatically fades in and
out, and does not accept interaction events.
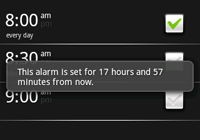
The screenshot below shows an example toast notification from the Alarm application.
Once an alarm is turned on, a toast is displayed to assure you that the
alarm was set.
A toast can be created and displayed from an Activity or
Service. If you create a toast notification from a Service, it
appears in front of the Activity currently in focus.
If user response to the notification is required, consider using a
Status Bar Notification.
The Basics
First, instantiate a Toast
object with one of the makeText() methods.
This method takes three parameters: the application Context,
the text message, and the duration for the toast. It returns a properly initialized Toast
object. You can display the toast notification with show(),
as shown in the following example:
Context context = getApplicationContext();
CharSequence text = "Hello toast!";
int duration = Toast.LENGTH_SHORT;

Toast toast = Toast.makeText(context, text, duration);
toast.show();
This example demonstrates everything you need for most toast notifications.
You should rarely need anything else. You may, however, want to position the
toast differently or even use your own layout instead of a simple text message.
The following sections describe how you can do these things.
You can also chain your methods and avoid holding on to the Toast object, like this:
Toast.makeText(context, text, duration).show();
Positioning your Toast
A standard toast notification appears near the bottom of the screen, centered horizontally.
You can change this position with the setGravity(int, int, int)
method. This accepts three parameters: a Gravity constant,
an x-position offset, and a y-position offset.
For example, if you decide that the toast should appear in the top-left corner, you can set the
gravity like this:
toast.setGravity(Gravity.TOP|Gravity.LEFT, 0, 0);
If you want to nudge the position to the right, increase the value of the second parameter.
To nudge it down, increase the value of the last parameter.
Creating a Custom Toast View
If a simple text message isn't enough, you can create a customized layout for your
toast notification. To create a custom layout, define a View layout,
in XML or in your application code, and pass the root View object
to the setView(View) method.
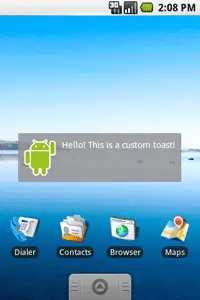
For example, you can create the layout for the toast visible in the screenshot to the right
with the following XML (saved as toast_layout.xml):
<LinearLayout xmlns:android="https://schemas.android.com/apk/res/android"
              android:id="@+id/toast_layout_root"
              android:orientation="horizontal"
              android:layout_width="fill_parent"
              android:layout_height="fill_parent"
              android:padding="10dp"
              android:background="#DAAA"
              >
    <ImageView android:id="@+id/image"
               android:layout_width="wrap_content"
               android:layout_height="fill_parent"
               android:layout_marginRight="10dp"
               />
    <TextView android:id="@+id/text"
              android:layout_width="wrap_content"
              android:layout_height="fill_parent"
              android:textColor="#FFF"
              />
</LinearLayout>
Notice that the ID of the LinearLayout element is "toast_layout". You must use this
ID to inflate the layout from the XML, as shown here:
LayoutInflater inflater = getLayoutInflater();
View layout = inflater.inflate(R.layout.toast_layout,
                               (ViewGroup) findViewById(R.id.toast_layout_root));

ImageView image = (ImageView) layout.findViewById(R.id.image);
image.setImageResource(R.drawable.android);
TextView text = (TextView) layout.findViewById(R.id.text);
text.setText("Hello! This is a custom toast!");

Toast toast = new Toast(getApplicationContext());
toast.setGravity(Gravity.CENTER_VERTICAL, 0, 0);
toast.setDuration(Toast.LENGTH_LONG);
toast.setView(layout);
toast.show();
First, retrieve the LayoutInflater with
getLayoutInflater()
(or getSystemService()),
and then inflate the layout from XML using
inflate(int, ViewGroup). The first parameter
is the layout resource ID and the second is the root View. You can use
this inflated layout to find more View objects in the layout, so now capture and
define the content for the ImageView and TextView elements. Finally, create
a new Toast with Toast(Context) and set some properties
of the toast, such as the gravity and duration. Then call
setView(View) and pass it the inflated layout.
You can now display the toast with your custom layout by calling
show().
Note: Do not use the public constructor for a Toast
unless you are going to define the layout with setView(View).
If you do not have a custom layout to use, you must use
makeText(Context, int, int) to create the Toast.


